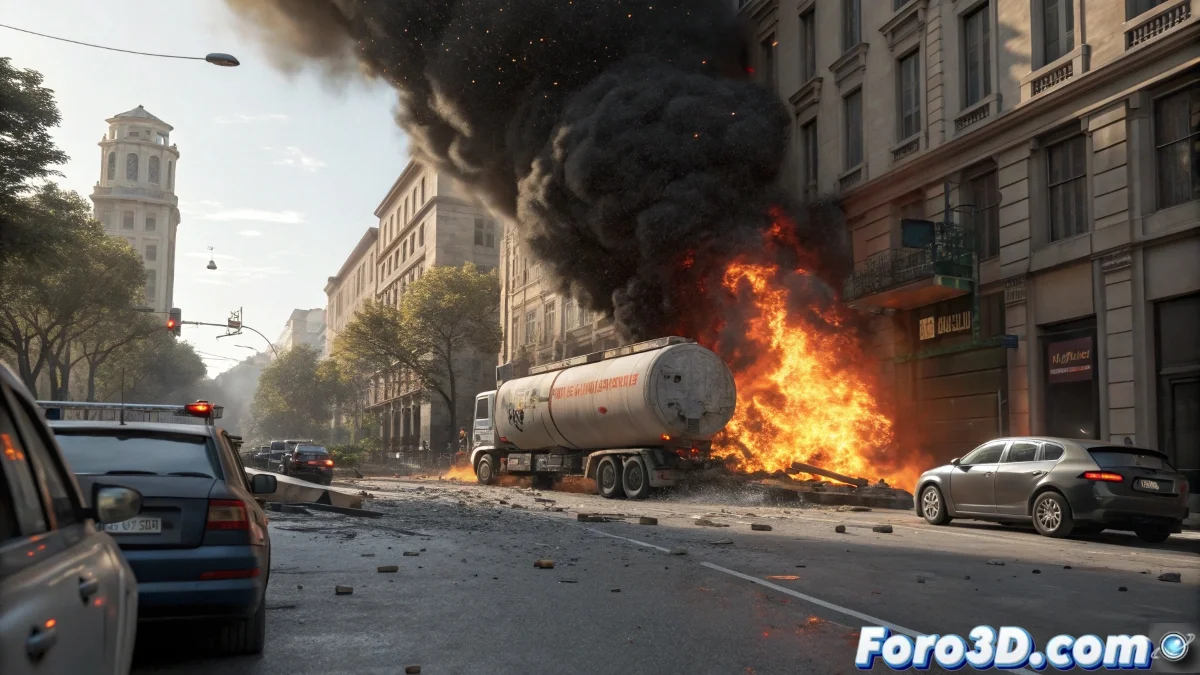
Step-by-Step Tanker Truck Explosion Simulation with Houdini
Creating a realistic explosion in Houdini is like taming chaos with mathematics and art 💥. To simulate the detonation of a gas-carrying tanker truck, the process begins with meticulous preparation of the vehicle's basic geometry and its urban environment, using 3D reference models that maintain real-world scale in meters. Once the structure is defined, powerful Pyro FX systems are used to simulate the initial fireball and gas expansion, creating that characteristic mushroom-shaped cloud that defines large-scale explosions. The sequence is enriched by applying particle systems for debris, metal fragments, and glass, combined with RBD (Rigid Body Dynamics) simulations that recreate how the truck's pieces break off and collide with the environment in a physically accurate manner.
When you turn chaos into algorithms and fire into adjustable parameters.
Geometry Preparation and Fracture Systems
The first crucial step is modeling or importing the tanker truck and its urban environment with metric precision. Group the geometries with Geometry nodes and organize them in LOPs/USD if working with Solaris. For realistic tank fracturing, apply Voronoi Fracture and use Glue Constraints to keep the pieces together initially, adjusting masses, center of gravity, and damping so that the destruction behaves physically credibly. The camera should be placed at street level, slightly angled, to capture the visual impact of the explosion with cinematic drama. 🎬
Pyro FX Simulation for Fire and Smoke
The star of the show is undoubtedly Houdini's Pyro FX system for simulating the detonation. Create a Pyro Source inside the tank and set up a Pyro Solver to manage the initial fireball with high temperature and density, short duration, and great expansion. For the smoke, add density, turbulence, and vorticity, adjusting substeps to resolve fast interactions and intense turbulences. To recreate the shockwave, use a radial SDF field or a velocity field that pushes the RBD and particles, creating that characteristic concentric propagation of real explosions.
Particle Systems and Integration
The details that seal the realism come from secondary particle systems for debris, sparks, and embers. Create a POP Network that emits particles from the fractured pieces, adding gravity, wind, and turbulence forces. For incandescent fragments, add color and emission controls. Optionally, you can simulate spilled fuel with FLIP particles emitted from the fractured container, applying collision with the street and vehicles, with viscosity and advection for greater realism. The connection between the pyro vector field and the RBD solver allows the explosion pressure to physically push the pieces, adjusting drag and bounce for each material type.
Lighting, Rendering, and Compositing
A key step is lighting control for cinematic realism. Add point lights with high intensity at the initial instant of the explosion for the flash, then allow the smoke to densify progressively with volumetrics that capture ambient light. For rendering, use Karma, Redshift, or Arnold, exporting AOVs for precise compositing in Nuke or After Effects, where you'll add lens distortion, bloom, chromatic aberration, and grain. The final color grading emphasizes the drama without sensationalism, remembering that the best way to avoid these catastrophes is by learning from them through simulation… because sometimes recreating the disaster is the best way to prevent it. 😉