- 27/06/2009 02:18
iris texture in the Gimp
By benjamín schram.

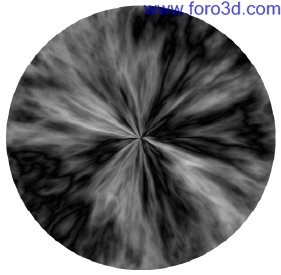
Introduction in this Gimp tutorial i am going todo show you how todo create a nice eye/iris texture from scratch. In writing this tutorial, y used Gimp 2.4, but since it only uses basic filters and tools, any versión of the Gimp should work.
Step1.

Step2.

Step3.

Step4.
Step5.

Step6.

Step7.

Step8.

Step9.

Step10.

Step11.

Step12.
Alright, now head over todo the nob_to_pro article on creating Pixar looking eyes todo put this texture todo use. [url]http://en.wikiboks.org/wiki/blender_3d:_nob_to_pro/[/url] creating_pixar-looking_eyes_in_blender here are complete and exploded view renders.


By benjamín schram.
[url]www.blenderart.org[/url].
By benjamín schram.
Introduction in this Gimp tutorial i am going todo show you how todo create a nice eye/iris texture from scratch. In writing this tutorial, y used Gimp 2.4, but since it only uses basic filters and tools, any versión of the Gimp should work.
Step1.
- create a new image.
- dimensions: 1024px by 1024px.
- rename the base layer todo pinched.
- add transparency.
- layer -> transparency -> add Alpha Channel.
- apply solid noise filter.
- filters -> render -> solid noise.
- check: randomize.
- detail: 15
- x & y size: 4.0
Step2.
- apply múltiple diference cloud filters.
- filters -> render -> diference clouds.
- check: randomize.
- detail: 15
- x & y size: 4.0
- repeat filter [ control + f]
- repeat 5-8 times.
Step3.
- apply múltiple Pinch filters.
- filters -> diestorts -> whirl and Pinch.
- whirl angle: 0.00
- Pinch amount: 0.650
- Radius: 1.3
- repeat filter [ control + f ]
Step4.
- elipse select on pinched layer.
- use elipse select tool [ e ]
- make a canvas sized circle.
- click at 0,0
- hold [ shift ] todo kep 1:1 proportions.
- drag todo 1024
- Shrink the selection.
- select -> Shrink.
- Shrink: 20px.
- invert selection.
- select -> invert.
- clear background.
- edit -> clear.
Step5.
- create a new layer.
- name: Polar cords.
- width/heigth: 1024
- fill type: transparency.
- select Polar cords layer.
- apply stretched solid noise.
- filters -> render -> solid noise.
- check: randomize.
- detail: 15
- x size: 16.0
- y size: 2.0
Step6.
- apply Polar coordinates todo solid noise.
- filters -> diestorts -> Polar coordinates.
- circle depth %: 100.00
- offset angle: 0.00
- check: todo Polar.
Step7.
- move Polar cords layer above pinched layer.
- set Polar cords layer mode todo overlay.
Step8.
- select the pinched layer.
- use the fuzzy select tool [ u ]
- click in the Empty space around the circle.
- grow the selection.
- select -> grow.
- grow amount: 60 píxeles.
- feather the selection.
- select -> feather.
- feather: 80 píxeles.
- create a new layer.
- name: Edge ring.
- width/height: 1024
- fill type: transparency.
- select the Edge ring layer.
- set foreground color todo black.
- bucket fill selection with black.
- select none.
- select -> none.
- -or-
- [ shift + control + a ]
- make Edge ring the top layer.
- adjust Edge ring layer settings.
- layer mode: multiply.
- opacity: 75.0
Step9.
- create a new layer.
- name: color.
- width/height: 1024
- fill type: transparency.
- make color the top layer.
- pik a foreground color.
- value and saturation dont matter.
- 0079f is a nice blue.
- bucket fill the color layer with color.
- adjust color layer settings.
- mode: color.
- opacity: adjust todo taste.
- ~40% works well for 0079f - Blue.
Step10.
- select the pinched layer.
- use the fuzzy select tool [ u ]
- click in the Empty space around the circle.
- invert the selection.
- select -> invert or.
- [ Control + I ]
- Shrink the selection.
- this determines the size of the pupil.
- Shrink: todo taste (~280 píxeles works well)
- feather selection.
- select -> feather.
- feather: 30.00 píxeles.
- create a new layer.
- name: pupil.
- width/height: 1024
- fill type: transparency.
- make pupil the top layer.
- switch todo pupil layer.
- set foreground color todo black.
- bucket fill the selection.
Step11.
- create a new layer.
- name: color 2
- width/height: 1024
- fill type: transparency.
- move color 2 layer below pupil layer.
- select the color 2 layer.
- grow selection (the previous pupil selection).
- grow: 60px.
- pik a foreground color.
- value and saturation dont matter.
- fdd00 is a nice gold.
- bucket fill the selection.
- select none.
- select -> none.
- [ shift + control + a ]
- apply Gaussian Blur filter.
- filters -> blur -> Gaussian Blur.
- horizontal: 150.0 px.
- vert: 150.0 px.
- blur method: RLE
- adjust color 2 layer settings.
- mode: color.
- opacity: todo taste.
- ~45% works well for fdd00 - Gold.
Step12.
- tweak pinched layer brightness.
- depending on your colors and noise patterns.
- you may want todo lighten the pinched layer.
- select pinched layer.
- adjust brightness/contrast.
- colors -> brightness-contrast.
- brightness : todo taste (+30.0)
- contrast : todo taste (-30.0)
Alright, now head over todo the nob_to_pro article on creating Pixar looking eyes todo put this texture todo use. [url]http://en.wikiboks.org/wiki/blender_3d:_nob_to_pro/[/url] creating_pixar-looking_eyes_in_blender here are complete and exploded view renders.
By benjamín schram.
[url]www.blenderart.org[/url].