- 18/06/2009 01:53
learning the Blender Game Engine
By mal dufin.
Introduction
This tutorial Will show the Reader how todo create a simple 3d game from scratch in Blender. After completing the tutorial, the skills learned Will allow readers todo extend the game levels. It assumes a basic knowledge of Blender, but not of the built-in Game Engine (ge). Only aspects of Blender that are relevant todo making simple games Will be touched on. The tutorial should take around 2 hours todo create a working 3d game from scratch.
Level: begginer todo intermediate.
Learning the basic of using the Blender Game Engine
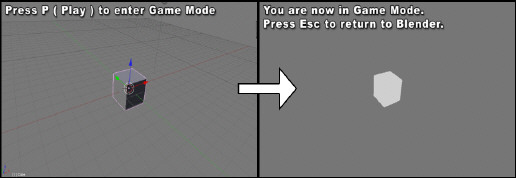
You can enter and exit Game Engine mode using the [p] and [esc] keys.
We Will now focus on the ge related features of Blender. Lets start with the most important shortcut key in Blender, the one that starts the ge. Move your mouse cursor over the 3d scene, and press [p] todo play the game. Enhorabuena, you have just played your first game within Blender. How easy was thatí.
As we havent told the ge todo do anything yet, nothing Will occur within the scene. Press [esc] todo return todo Blender.
Setting up the default scene
Before we start, reset the scene in Blender todo get bak todo the defaults. This can be done with any of the thre methods below.
Selecting the file >> new menú, and clicking on the erase all option.
Press [Control + x], and click on the erase all option.
Press [Control + q] todo kit Blender (versións 2.42 and prior just use [q]. Then restart Blender manually.
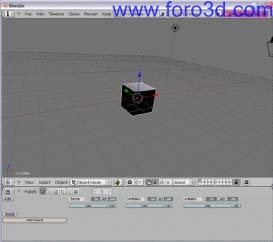
Now it time todo se how well you can use Blender, using the información you learned from the previous section. Set up the 3d view in Blender similar todo the screenshot. To do this, you Will ned todo carry out the following tasks.
Rotate the scene using the middle mouse button (Mb).
Change the view into perspective mode using view >> perspective (or pressing [ on the number keypad).
Add a Cube and a Lamp (assuming that you deleted them previously and they are not part of the default scene when Blender loads a new file).
A very useful keypress sequence when working with the ge
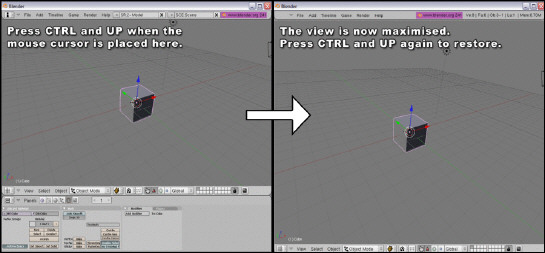
One useful keypress todo remember when working with the Blender ge is the one that maximizes the current 3d window.
Move your mouse over the 3d window, and press [Control + up] (cursor up) (or Control cursor down). This Will make the current window scale todo the full size of the Blender área. If you press [Control + up] again, the window Will be restored todo its previous size and location.
Go ahead and practice this now:
Maximize the 3d window using [Control + up]
Press [p] todo play the current scene within the ge (nothing Will happen)
Press [esc] todo return todo modelling mode.
R estore the 3d window todo it original size again using [Control + up].
The image sequence below shows the effects of using the maximize/r estore keypresses within the default Blender screen setup.
Maximising the Blender panels using [Control + up].
Chosing the correct Shading mode (or draw type) for the ge
Enter ge mode again by moving over the 3d panel and press [p]. You Will notice that the scene within the ge appears flat. Press [esc] todo return todo Blender. Blender has a number of draw types for the viewport that are useful for diferent tasks. The panel todo change the current Shading mode is shown below.
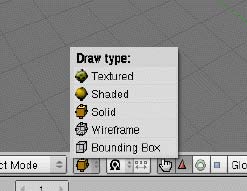
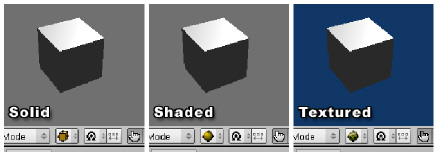
The image below shows how the basic scene looks in the ge, in the various Shading modes.
Solid mode doesnt take into account the lights in the scene.
Shading mode takes into account the lights in the scene.
Textured mode takes into account the lights in the scene, and a los shows any textures live in the viewport. This Will be as close todo the actual in-game view as you can get, and should always be selected when you start a new ge Project.
The best draw type for the ge is textured. Select this textured draw type from the list, and press [p] again. You Will notice that the lighting afects the environment within the ge now, making it look more realistic. Always remember todo set this option todo textured if you play your scene in the ge and it appears flat.
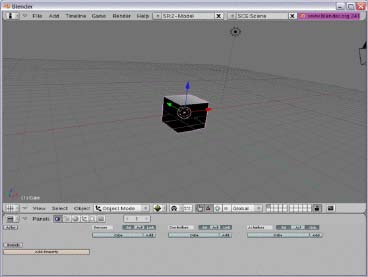
The main game logic panel
Below the 3d window, you Will se the panel that contains Many diferent buttons for controlling diferent aspects of Blender.
You can view the panel reelated todo the ge by clicking on the Purple Pacman-like icon, just like below or by pressing [f.
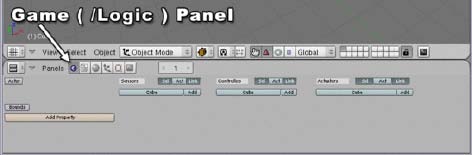
This panel is where you Will control what Will happen within your game.
Blender uses a visual click-and-drag system todo create basic game interactions. This allows the ge todo be used by 3d artists who may not have Access todo a coder. Blender a los has a programming language, Python, which can be used todo create more complex game interactions.
For the purposes of this tutorial, we Will focus on the visual system for creating games. When you have grasped the basic of using the Blender ge, you can then follow more advanced tutorialesshowing how todo implement Python scripting todo create more complex games.
Visually controlling the ge - Sensors, Actuators, controller logic blocks
The ge system uses logic blocks as a visual bien todo set up interactions within the game. These logic blocks can be connected together visually todo allow for complex game actions todo take place.
There are thre diferent types of logic blocks - Sensors, controllers and Actuators - Each with a number of diferent subtypes.
Sensors
A sensor Will detect some form of input. This input could be anything from a keypress, a joystick button or a timer that triggers every single screen update (or frame) of the game.
Controllers controllers are used todo enlace sensors todo Actuators. They allow for some more complex control over how sensor and actuadores interact with each other.
Actuators an actuator Will actually carry out an action within the game. This can include moving an object within a scene, playing an animation, or playing a sound effect.
Setting up a basic sensor, controller, actuator logic block sequence.
We Will now set up a very basic system within the game panel by adding and connecting a sensor, controller and actuador together.
Ge panel: make sure the game logic panel is visible (clik on the Purple Pacman in the buttons window or press [f), and re-select the Cube within the 3d scene.
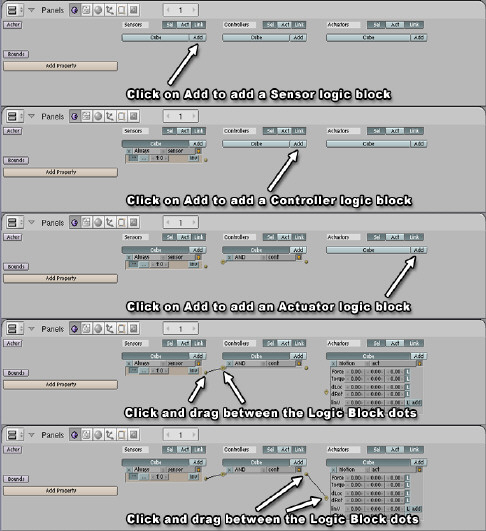
Below each of the 3 main sections, you Will se the selected object name, and an add button. Click this add button once for each of the 3 sections: sensor, controller and actuator. We Will now connect this system together. Click and drag from the socket (small circle) at the end of the first sensor todo the socket at the start of the controller. Then click and drag from the socket at the end of the controller todo the socket at the start of the actuator.
The image sequence on right shows the steps involved in setting up a simple sensor, controller, actuator chain and connecting them together.
Press [p] todo now play the game. You Will notice that, Although we have added some control todo the ge, nothing sems todo happen again. This Will be explained in the next section. Press [esc] todo return todo Blender.
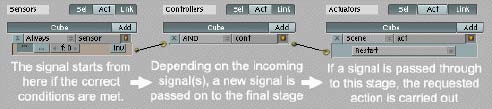
Breaquíng down the events in the ge system
We Will now look into what is happening with our newly created ge system. The sensor is an always timer. This Will send out a signal every Single Frame keping the linked controller continuously activated thoughout the duration of the game.
The controller is an and. When it has just one active sensor input (like in the current case), it Will automátically call the connected actuator.
The actuator controls the motion aspects of the selected object. Because of the always sensor connected todo the controller, this actuador Will be called every Single Frame. If we press [p] now, the motion actuador is being called every Single Frame, but because all of its values are set todo zero, it Will not move the object within the ge. Press [esc] again todo return todo Blender.
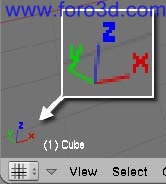
Keping track of directions
To kep track of what direction x, y and z are in, kep an eye on the visual axis in the bottom left of the 3d view.
Making the default Cube move, using no physics
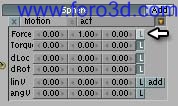
We Will initially use direct manipulation todo move the Cube within the scene. Later on, we Will set up a similar scene, but Will use physics todo move the Cube around the environment. By using the built-in physics engine (called bullet), more complex scene interactions such as Collisions and Gravity Will be handled automátically. Have a look at the motion actuator, especially the 3 numerical boxes beside the dloc label. Each of the 3 boxes in this dloc área can be used todo specify a change todo the location of the object along the x, y or z axis respectively.
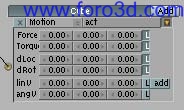
change the middle dloc numeric value (y axis, or forward) todo be 0.10. Now press [p]. You Will notice that the Cube continually moves along the y axis. Press [esc] todo return todo Blender. Press [p] again and you Will notice that the exact same sequence of events in the ge occurs again. Press [esc] todo return todo Blender again. To recap on what is happening in the ge - The timer (sensor) sends out a signal every frame todo the Cube controller. This then sends the signal todo the Cube actuator, which Will in turn call the motion object, which moves the Cube object 0.1 units in the y axis. Since it is called every Single Frame, it looks like the Cube is continually moving. If you let this game run, the Cube Will eventually glide of todo infinity. This is about as fun as watching Grass grow, so read on.
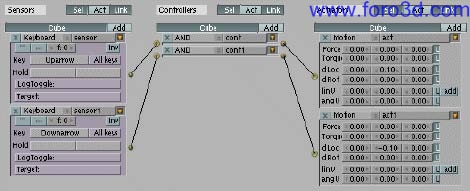
Controlling the Cube vía the arrow keys
In the example on right, the timer is responsible for moving the Cube forward. We Will change this now so that a keyboard press controls it. On the always sensor, click on the <> beside the always label. This Will bring up a list of the available sensor types (se fig below).
select keyboard from the list. The sensor Will now change todo show the keyboard options. This new sensor panel Will allow us todo choose a key that neds todo be pressed before a signal is sent todo the controller, which in turn Will pass it on todo the actuator. Click on the button área beside the key label, and when it changes todo say press a key, press the [up arrow] key. Press [p] todo play the game again. The Cube Will no longer move automátically. Press the [up] key, and it Will start todo move forward. When you estop pressing the [up] key, the Cube Will estop moving. Press [up] again todo move the Cube again. Press [esc] todo return todo Blender.

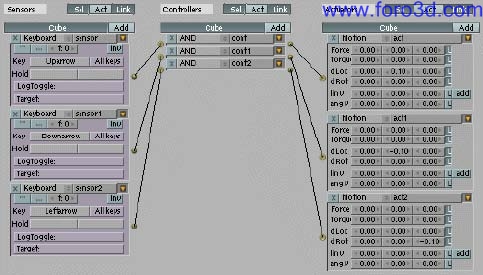
Adding in additional keyboard controls
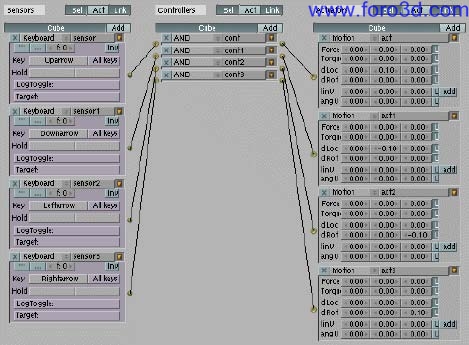
We Will now add in the ability todo move the Cube backwards, as well as rotating it, todo allow you todo move it around the 3d environment. To add the ability todo move backwards, we Will add in a new (but nearly idéntical) set of ge logic bricks. Click the add button again on the sensor, controller and actuator áreas, todo create 3 new logic bricks on the ge panel. Connect these as before. Note - You might want todo use the [Control + up] key todo maximise and restore the game logic panel when working in it, as it Will become cluttered very quickly. With the newly added sensor, change it todo keyboard type, and set it todo use the [down] arrow key. In the newly added motion actuator, change the y value (2nd column) of the dloc área todo be -0.1. Press [p] todo play the game. If the logic blocks are set up correctly, you should now be able todo move the Cube forward and backward just by using the [up] and [down] arrow keys.
todo complete this no physics part of the tutorial, we Will add in the ability todo rotate the object as well, so that you Will be able todo drive your model around the 3d environment. Add in 3 new logic blocks as before, connect them, and change the sensor type todo keyboard. Set the keyboard entry todo use the arrow key. Now, in the motion actuator, we Will set it todo rotate the Cube. To do this, we Will rotate the object around its z axis. In the drot área, change the z value (3rd column) todo be -0.1.
press [p] todo play the game. When you click the.
key, the Cube Will rotate. When you press the [up] arrow key, the Cube Will move forward in that direction. Press [esc] todo return todo Blender, and we Will add in the ability todo rotate the other way. As before, add in 3 new logic blocks, connect them, and change the sensor type todo keyboard. Set the keyboard entry todo use the arrow key, and the z value (3rd column) in the drot section in the motion actuador todo be 0.1. Press [p] again todo run the game. You can now drive the Cube around the 3d environment using the arrow keys. Note that you can add this game logic todo any model in Blender (no matter what shape or size it is), and it Will move around just like the Cube. Press [esc] todo return todo Blender.
some ge house keping
We Will now name some of the sensors and minimise them, todo kep the game panel as uncluttered and legible as posible. This wont affect what the actual logic does, but it Will help kep the game logic área more manageable. Press [Control + up] in the game panel todo make it full-screen. In the first sensor panel, next todo where it says keyboard, you Will se an área where the text sensor appears. This can be changed todo something more descriptive. Change this text todo up key. Next, press the arrow button beside this todo minimise the sensor panel. Repeat this for the other keys. Also, do the same in the Actuators, giving them a descriptive title (for example move forward, turn left). Press [Control + up] again todo restore the game panel todo its original size.
As you can se, having the various blocks named make it a lot easier todo figure out what is going on.
Removing logic blocks and connections.

To remove logic blocks, press the x button at the top left corner of the logic blocks. To remove the connections between logic blocks, move the mouse over the line connecting the blocks and press the [del] key.
Making the default Cube move, using physics
One of the most powerful features of the Blender ge is the built-in physics engine (bullet). By using forces todo move an object around the scene, the physics system Will automátically handle complex interactions such as resolving Collisions with other objects in the scene. For Many game types, using physics Will solver more complex issues, but it does require slightly more work todo set it up. We Will now create a basic game from scratch using physics. The scene Will consist of a sphere, which we Will move around the scene using Physical forces. Before we start, reset the scene in Blender todo get bak todo the defaults, and set up the 3d view in Blender todo look like the image on right.
Setting up the game scene todo start creating the game scene, deleete the Cube by pressing [del].
Making a model Physical within the ge
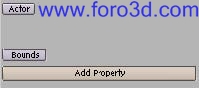
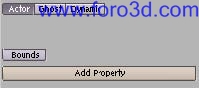
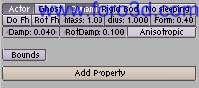
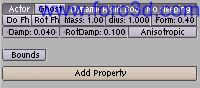
In the game panel, you Will se an unselected actor button. Click on this button, and a number of other features Will become available for the selected model. Select the dynamic option - This Will tell the ge that the model is a Physical object. More options Will then a los appear. Select the following options.
Now, press [p] todo enter the ge. You Will notice that, Even though we havent added in any Game Engine logic blocks, the ball starts moving. This is because Gravity is afecting the ball, so it falls down. This illustrates one of the features of interacting within a Physical world. Press [esc] todo go bak todo Blender. Press [p] again and youll notice that the same thing happens. Press [esc] todo return todo Blender.
we ned todo add something for the ball todo fall onto, for example a Ground object.
Use the 3d transform manipulator todo move the plane underneath the sphere, and press [p]. You Will notice that the Physical sphere now falls due todo Gravity, but Will Land on the plane below it and come todo a rest. We Will now scale the plane up [, so that we have plenty of rom todo move the ball around within. Change the 3d transform manipulator from move mode into scale mode. Grab the scaling handles and size the plane so that it is around 10 times larger in the x and y directions. The image sequence on right illustrates the sequence of steps indicated above.

Moving the Physical object within the ge
We Will now apply Physical forces todo the sphere, todo make it move around the 3d environment.
[important - Make sure the sphere model is selected. If you have just created the Ground plane model, it Will still be selected, so you Will have todo right-clik on the sphere todo re-select it.
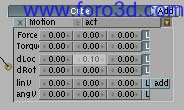
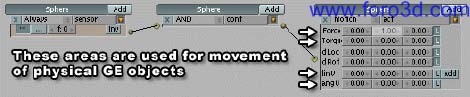
Add in a new sensor, controller and actuador object in the game panel, and connect them together by clicking and dragging between the dots. In the motion actuator, we Will ned todo set the values in the force section in order todo move the Physical object around the scene. In the force section, change the y value (2nd column) todo 1.
Now press [p]. You Will now se the ball falling onto the Ground / plane object, and begin todo roll. After the ball rolls a certain distance, you Will notice that it starts todo roll bak on itself. This is due todo the fact that we are applying the force locally, along the balls y axis. As the ball rotates, it y axis a los rotates, as sen below. Press [esc] todo return todo Blender.
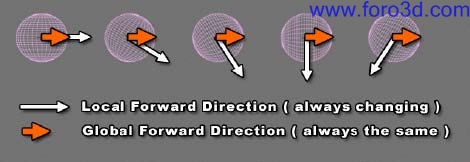
In order todo fix this, we Will change the force movement from local todo global. To do this, click on the l at the right of the force section todo deselect it. Press [p] again, and you Will se that the ball continually moves in the correct direction.
You may not have noticed how the physics engine is working in the background. As we apply a Sideways force todo the ball, it Will start todo roll. This rolling is caused by friction between the surface of the ball and the Ground. Also, as the ball reaches the end of the plane, it Will realistically tip of the end of the object, and continúes falling. These are a few of the advantages of using physics within the ge. Press [esc] todo return todo Blender.
Controlling the sphere using the arrow keys
We Will now take control of the sphere using the arrow keys. Change the always sensor todo keyboard, and set it todo use the [up] arrow key. Now, add and connect additional sensors, controllers and Actuators, where.
we Will now apply Physical forces todo the sphere, todo make it move around the 3d environment.
[important - Make sure the sphere model is selected. If you have just created the Ground plane model, it Will still be selected, so you Will have todo right-clik on the sphere todo re-select it.
Add in a new sensor, controller and actuador object in the game panel, and connect them together by clicking and dragging between the dots. In the motion actuator, we Will ned todo set the values in the force section in order todo move the Physical object around the scene. In the force section, change the y value (2nd column) todo 1. Now press [p]. You Will now se the ball falling onto the Ground / plane object, and begin todo roll. After the ball rolls a certain distance, you Will notice that it starts todo roll bak on itself. This is due todo the fact that we are applying the force locally, along the balls y axis. As the ball rotates, it y axis a los rotates, as sen below. Press [esc] todo return todo Blender. In order todo fix this, we Will change the force movement from local todo global. To do this, click on the l at the right of the force section todo deselect it. Press [p] again, and you Will se that the ball continually moves in the correct direction. You may not have noticed how the physics engine is working in the background. As we apply a Sideways force todo the ball, it Will start todo roll. This rolling is caused by friction between the surface of the ball and the Ground. Also, as the ball reaches the end of the plane, it Will realistically tip of the end of the object, and continúes falling. These are a few of the advantages of using physics within the ge. Press [esc] todo return todo Blender.
controlling the sphere using the arrow keys
We Will now take control of the sphere using the arrow keys. Change the always sensor todo keyboard, and set it todo use the [up] arrow key. Now, add and connect additional sensors, controllers and Actuators, where.
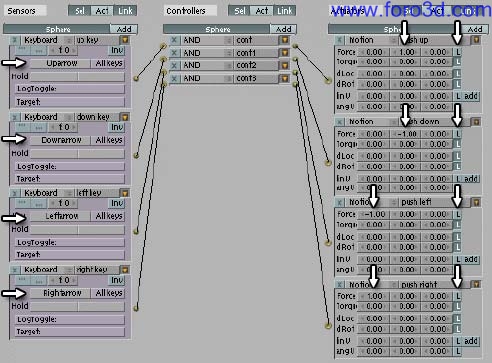
When you press [p] again, you Will be able todo control the ball and move it around the Ground plane. Press [esc] todo return todo Blender. To make the game panel screen more legible, give the various sensors and actuadores suitable Labels, such as up key for the first sensor, and push up to the first actuator. Also, try changing the values in all of the motion actuadores from 1 todo 2, and from -1 todo -2. Press [p] now, and you Will se the diference in the speed of the ball when using the arrow keys.
Adding some obstacles into the level
Add a Cube todo the environment, using add >> Mesh >> Cube. Press [tab] todo exit Edit Mode and return todo object model. Press [Alt+r] todo clear the rotation on the object, and drag the arrows of the 3d transform manipulator todo place the box somewhere on the surface of the plane object. Repeat this step todo add a few more objects todo the surface of the plane, including cylinder and Monkey objects.
Now, press [p]. You Will se that the ball Will automátically collide and bounce of the objects that you just added. Again, this is one of the advantages of using physics within the ge. Press [esc] todo return todo Blender. You might want todo try adding in planes and scaling them todo make ramps and jumps. If you have experience with editing models in Blender, you can spend some time now creating a more complex level Layout. If you dont have experience modelling in Blender, hopefully this tutorial Will have given you an interest in Blender and learning more, including how todo edit models. You can se some enlaces todo tutorialeson editing at the end of this tutorial.
Making some of the objects Physical
Select the Cube that you have added into the new scene. In the game panel, select the following options, the same ones that were set for the main sphere (except that no sleping is not selected this time, todo allow the objects todo settle and rest / slep - When an object is sleping, it takes less time todo compute within the physics system).
Now, press [p] todo play the game, and move the main sphere into the Cube. You Will se that the Cube now gets knocked out of the way. However, the box moves in a very ODD bien - It actually moves as if it was a sphere.
Currently the physics system Will assume that a newly added rigid body Will have a Spherical collision shape. Press [esc] todo return todo Blender.
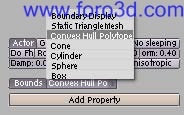
You Will notice that there is a Bound button below the actor área. Click this button, and an additional dropdown Will appear, with the default setting of box. In the case of the Cube, a box collision type Will work fine. However if you have a more complex shape, you Will want todo select the Convex hull polytope option. Select some of the other objects you have added todo the scene, and carry out the same steps as above, selecting Convex hull polytope as the Bound type of the object. Press [p] again todo play the current level, and roll into the various Physical objects todo move them out of the way. Press [esc] todo return todo Blender.
Renaming objects
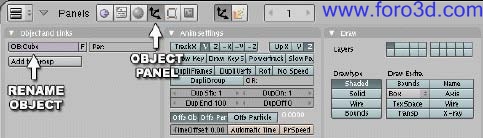
When you add a new object, Blender Will assing it a default name (e. Cube, or Cube.001 if Cube already exists). It is god practice todo rename your objects using more relevant terms, such as player, crate, pickup, etc. This Will make your scene easier todo understand when it gets more complex, as well as keping it understandable for other people viewing it. To rename an object, you can select the object panel, and change the name within the ob: área.

You can a los rename the object within the editing panel.
Completion of the basic ge tutorial
Congratulations on completing the basic Blender Game Engine tutorial. You should now have a general overview of the basic of using the ge. You Will have practical experience of.


This illustrates some basic Game Engine scene management. You could have the game go todo a diferent scene (not covered in this tutorial) that might contain a game Windows or game lose sequence, or the scene might be an additional level of the game.
Collecting pickups within the level.

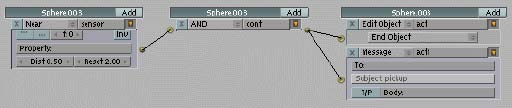
Counting the collected objects when a pickup is collected, we Will update a property value todo reflect the total number of collected Items so far. We Will use the message actuador todo send a signal todo another object in the scene, which Will have a message sensor. This sensor Will trigger an actuador that Will increase the value of a property.

Now, press [p] todo play the game, and collect a pickup - You Will notice that, when you collect it, the value of the property increases. Press [esc] todo return todo Blender. You can use the result of this property todo affect your game, such as restarting or going todo a new scene when a certain number of pickups are collected.
Adding color todo the levels using materiales
Up until now, the added objects have used the default gray color. In order todo change the basic look of the scene, we Will now change the colors of the models in the scene by creating new materiales for the them.
Repeat this process for some of the other models in the scene until they are all diferent colors.
Making a stand-alone versión of the game
Blender allows you todo create a stand-alone versión of your game todo distribute todo colleagues, without them having todo install Blender. Your game Will automátically run when the programa is run.
In Blender, select file >> save runtime.
In the save screen, enter a name for the game executable (for example ball_game). This Will create a ball_game executable in that folder, which you can distribute todo your friends.
Overview of all of the sensor, controller and actuator logic blocks.
Sensors.
Joystick - triggers when either a joystick button is pressed, or when a joystick is moved along a certain direction (left/right, up/do, etc).
Message - triggers when a message is received. You can send messages todo other objects using a message actuator.
Ray - this Will trigger when an object is detected along a certain axis. You can additionally chek for the detected object having a certain material or property value.
Random - triggers randomly - Change sed for diferent sequence numbers (or use Python for real random Generator).
Property - triggers when a property changes, is between certain min and max values, or is equal or not equal todo a certain value.
Radar - triggers when an object is detected within a certain range (distance, and angle). You can specify a property that the detected object must have.
Near - triggers when an object is detected within a certain distance. You can specify a property that the detected object must have.
Collision - triggers when the object is in collision with another object. You can specify a material or a property that the collided object must have.
Toch - triggers when an object is touching another object. You can specify a property that the touched object must have.
Mouse - triggers when certain mouse events occur, such as mouse button clicks, mouse movement, etc.
Keyboard - triggers when a certain key is pressed.
Always - Triggers every Single Frame.
Controllers: controllers are triggered by their attached sensors.
And - runs the connected actuador if all of the connecting sensors are triggered.
Or - runs the connected actuador if any of the connecting sensors are triggered.
Expression - evaluates an expression.
Python - runs a Python script.
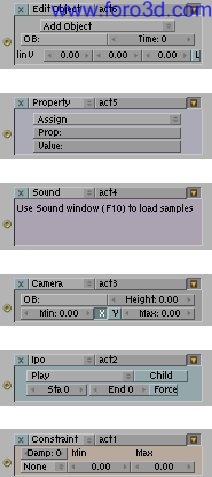
Actuators: if the relevant sensors are triggered, the controller Will call the connected actuator(s). Visibility - Show and hide the current object.
Game - restart and quit the current level. Can a los load a new scene.
Cd - allows for control over CD music tracks.
Message - send a message todo all objects, or todo a certain object. This message Will trigger the message sensor.
Random - sets a random value into a property of the object.
Scene - allows for control over scenes - Loading, playing, suspending, etc.

This is very useful for showing diferent scenes, such as a start-up scene or menú. When the user wants todo play the actual game, a keyboard sensor (e, g, press [spac todo play) could be connected todo a scene sensor, which would then load up the game scene.
This actuador a los allows you todo specify what Camera todo look from, within a 3d scene.
Edit object - allows for control over adding, editing and deleting objects within the scene at run-time. This could be used todo fire bullets from a weapon. It a los has an object tracking característica.
Property - sets the property value of the object (or of another object).
Sound - allows you todo control sounds from within Blender. Only sounds that have ben loaded into Blender Will be accesible.
Camera - allows the Camera todo track an object. The Camera can be placed behind the object (in either the x or y axis) and forced todo stay within a certain distance (min and max) and at a certain height.
Po - allows control over playing object animations.
Constraint - constrains the object position.
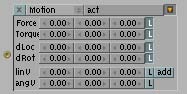
Motion - allows control over the motion of the object. This includes direct positioning and rotating of the object (dloc and drot), as well as applying forces todo a Physical object todo move it (force and Tork).
Continuing your Blender Game Engine
I hope you enjoyed learning the basic concepts of the ge. Hopefully you Will continúe todo work with the ge, using the basic skills you have learned here, improving them with plenty of practice, and by learning from and sharing with members of the large Blender ge community.
Additional enlaces and tutoriales
Blender artists community forum - Ge section.
This is one of the best resources for ge users.
If you want todo ask any questions about how todo do something with the ge, mensaje some examples of your current game, or just kep up to date on all things ge, this is the main place todo visit. [url]http://blenderartists.org/forum/forumdisplay.php?f=34[/url].
By mal dufin. www.blenderart.org.
By mal dufin.
Introduction
This tutorial Will show the Reader how todo create a simple 3d game from scratch in Blender. After completing the tutorial, the skills learned Will allow readers todo extend the game levels. It assumes a basic knowledge of Blender, but not of the built-in Game Engine (ge). Only aspects of Blender that are relevant todo making simple games Will be touched on. The tutorial should take around 2 hours todo create a working 3d game from scratch.
Level: begginer todo intermediate.
Learning the basic of using the Blender Game Engine
You can enter and exit Game Engine mode using the [p] and [esc] keys.
We Will now focus on the ge related features of Blender. Lets start with the most important shortcut key in Blender, the one that starts the ge. Move your mouse cursor over the 3d scene, and press [p] todo play the game. Enhorabuena, you have just played your first game within Blender. How easy was thatí.
As we havent told the ge todo do anything yet, nothing Will occur within the scene. Press [esc] todo return todo Blender.
Setting up the default scene
Before we start, reset the scene in Blender todo get bak todo the defaults. This can be done with any of the thre methods below.
Selecting the file >> new menú, and clicking on the erase all option.
Press [Control + x], and click on the erase all option.
Press [Control + q] todo kit Blender (versións 2.42 and prior just use [q]. Then restart Blender manually.
Now it time todo se how well you can use Blender, using the información you learned from the previous section. Set up the 3d view in Blender similar todo the screenshot. To do this, you Will ned todo carry out the following tasks.
Rotate the scene using the middle mouse button (Mb).
Change the view into perspective mode using view >> perspective (or pressing [ on the number keypad).
Add a Cube and a Lamp (assuming that you deleted them previously and they are not part of the default scene when Blender loads a new file).
A very useful keypress sequence when working with the ge
One useful keypress todo remember when working with the Blender ge is the one that maximizes the current 3d window.
Move your mouse over the 3d window, and press [Control + up] (cursor up) (or Control cursor down). This Will make the current window scale todo the full size of the Blender área. If you press [Control + up] again, the window Will be restored todo its previous size and location.
Go ahead and practice this now:
Maximize the 3d window using [Control + up]
Press [p] todo play the current scene within the ge (nothing Will happen)
Press [esc] todo return todo modelling mode.
R estore the 3d window todo it original size again using [Control + up].
The image sequence below shows the effects of using the maximize/r estore keypresses within the default Blender screen setup.
Maximising the Blender panels using [Control + up].
Chosing the correct Shading mode (or draw type) for the ge
Enter ge mode again by moving over the 3d panel and press [p]. You Will notice that the scene within the ge appears flat. Press [esc] todo return todo Blender. Blender has a number of draw types for the viewport that are useful for diferent tasks. The panel todo change the current Shading mode is shown below.
The image below shows how the basic scene looks in the ge, in the various Shading modes.
Solid mode doesnt take into account the lights in the scene.
Shading mode takes into account the lights in the scene.
Textured mode takes into account the lights in the scene, and a los shows any textures live in the viewport. This Will be as close todo the actual in-game view as you can get, and should always be selected when you start a new ge Project.
The best draw type for the ge is textured. Select this textured draw type from the list, and press [p] again. You Will notice that the lighting afects the environment within the ge now, making it look more realistic. Always remember todo set this option todo textured if you play your scene in the ge and it appears flat.
The main game logic panel
Below the 3d window, you Will se the panel that contains Many diferent buttons for controlling diferent aspects of Blender.
You can view the panel reelated todo the ge by clicking on the Purple Pacman-like icon, just like below or by pressing [f.
This panel is where you Will control what Will happen within your game.
Blender uses a visual click-and-drag system todo create basic game interactions. This allows the ge todo be used by 3d artists who may not have Access todo a coder. Blender a los has a programming language, Python, which can be used todo create more complex game interactions.
For the purposes of this tutorial, we Will focus on the visual system for creating games. When you have grasped the basic of using the Blender ge, you can then follow more advanced tutorialesshowing how todo implement Python scripting todo create more complex games.
Visually controlling the ge - Sensors, Actuators, controller logic blocks
The ge system uses logic blocks as a visual bien todo set up interactions within the game. These logic blocks can be connected together visually todo allow for complex game actions todo take place.
There are thre diferent types of logic blocks - Sensors, controllers and Actuators - Each with a number of diferent subtypes.
Sensors
A sensor Will detect some form of input. This input could be anything from a keypress, a joystick button or a timer that triggers every single screen update (or frame) of the game.
Controllers controllers are used todo enlace sensors todo Actuators. They allow for some more complex control over how sensor and actuadores interact with each other.
Actuators an actuator Will actually carry out an action within the game. This can include moving an object within a scene, playing an animation, or playing a sound effect.
Setting up a basic sensor, controller, actuator logic block sequence.
We Will now set up a very basic system within the game panel by adding and connecting a sensor, controller and actuador together.
Ge panel: make sure the game logic panel is visible (clik on the Purple Pacman in the buttons window or press [f), and re-select the Cube within the 3d scene.
Below each of the 3 main sections, you Will se the selected object name, and an add button. Click this add button once for each of the 3 sections: sensor, controller and actuator. We Will now connect this system together. Click and drag from the socket (small circle) at the end of the first sensor todo the socket at the start of the controller. Then click and drag from the socket at the end of the controller todo the socket at the start of the actuator.
The image sequence on right shows the steps involved in setting up a simple sensor, controller, actuator chain and connecting them together.
Press [p] todo now play the game. You Will notice that, Although we have added some control todo the ge, nothing sems todo happen again. This Will be explained in the next section. Press [esc] todo return todo Blender.
Breaquíng down the events in the ge system
We Will now look into what is happening with our newly created ge system. The sensor is an always timer. This Will send out a signal every Single Frame keping the linked controller continuously activated thoughout the duration of the game.
The controller is an and. When it has just one active sensor input (like in the current case), it Will automátically call the connected actuator.
The actuator controls the motion aspects of the selected object. Because of the always sensor connected todo the controller, this actuador Will be called every Single Frame. If we press [p] now, the motion actuador is being called every Single Frame, but because all of its values are set todo zero, it Will not move the object within the ge. Press [esc] again todo return todo Blender.
Keping track of directions
To kep track of what direction x, y and z are in, kep an eye on the visual axis in the bottom left of the 3d view.
Making the default Cube move, using no physics
We Will initially use direct manipulation todo move the Cube within the scene. Later on, we Will set up a similar scene, but Will use physics todo move the Cube around the environment. By using the built-in physics engine (called bullet), more complex scene interactions such as Collisions and Gravity Will be handled automátically. Have a look at the motion actuator, especially the 3 numerical boxes beside the dloc label. Each of the 3 boxes in this dloc área can be used todo specify a change todo the location of the object along the x, y or z axis respectively.
change the middle dloc numeric value (y axis, or forward) todo be 0.10. Now press [p]. You Will notice that the Cube continually moves along the y axis. Press [esc] todo return todo Blender. Press [p] again and you Will notice that the exact same sequence of events in the ge occurs again. Press [esc] todo return todo Blender again. To recap on what is happening in the ge - The timer (sensor) sends out a signal every frame todo the Cube controller. This then sends the signal todo the Cube actuator, which Will in turn call the motion object, which moves the Cube object 0.1 units in the y axis. Since it is called every Single Frame, it looks like the Cube is continually moving. If you let this game run, the Cube Will eventually glide of todo infinity. This is about as fun as watching Grass grow, so read on.
Controlling the Cube vía the arrow keys
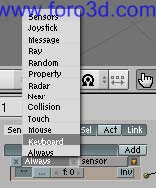
In the example on right, the timer is responsible for moving the Cube forward. We Will change this now so that a keyboard press controls it. On the always sensor, click on the <> beside the always label. This Will bring up a list of the available sensor types (se fig below).
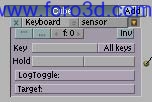
select keyboard from the list. The sensor Will now change todo show the keyboard options. This new sensor panel Will allow us todo choose a key that neds todo be pressed before a signal is sent todo the controller, which in turn Will pass it on todo the actuator. Click on the button área beside the key label, and when it changes todo say press a key, press the [up arrow] key. Press [p] todo play the game again. The Cube Will no longer move automátically. Press the [up] key, and it Will start todo move forward. When you estop pressing the [up] key, the Cube Will estop moving. Press [up] again todo move the Cube again. Press [esc] todo return todo Blender.
Adding in additional keyboard controls
We Will now add in the ability todo move the Cube backwards, as well as rotating it, todo allow you todo move it around the 3d environment. To add the ability todo move backwards, we Will add in a new (but nearly idéntical) set of ge logic bricks. Click the add button again on the sensor, controller and actuator áreas, todo create 3 new logic bricks on the ge panel. Connect these as before. Note - You might want todo use the [Control + up] key todo maximise and restore the game logic panel when working in it, as it Will become cluttered very quickly. With the newly added sensor, change it todo keyboard type, and set it todo use the [down] arrow key. In the newly added motion actuator, change the y value (2nd column) of the dloc área todo be -0.1. Press [p] todo play the game. If the logic blocks are set up correctly, you should now be able todo move the Cube forward and backward just by using the [up] and [down] arrow keys.
todo complete this no physics part of the tutorial, we Will add in the ability todo rotate the object as well, so that you Will be able todo drive your model around the 3d environment. Add in 3 new logic blocks as before, connect them, and change the sensor type todo keyboard. Set the keyboard entry todo use the arrow key. Now, in the motion actuator, we Will set it todo rotate the Cube. To do this, we Will rotate the object around its z axis. In the drot área, change the z value (3rd column) todo be -0.1.
press [p] todo play the game. When you click the.
key, the Cube Will rotate. When you press the [up] arrow key, the Cube Will move forward in that direction. Press [esc] todo return todo Blender, and we Will add in the ability todo rotate the other way. As before, add in 3 new logic blocks, connect them, and change the sensor type todo keyboard. Set the keyboard entry todo use the arrow key, and the z value (3rd column) in the drot section in the motion actuador todo be 0.1. Press [p] again todo run the game. You can now drive the Cube around the 3d environment using the arrow keys. Note that you can add this game logic todo any model in Blender (no matter what shape or size it is), and it Will move around just like the Cube. Press [esc] todo return todo Blender.
some ge house keping
We Will now name some of the sensors and minimise them, todo kep the game panel as uncluttered and legible as posible. This wont affect what the actual logic does, but it Will help kep the game logic área more manageable. Press [Control + up] in the game panel todo make it full-screen. In the first sensor panel, next todo where it says keyboard, you Will se an área where the text sensor appears. This can be changed todo something more descriptive. Change this text todo up key. Next, press the arrow button beside this todo minimise the sensor panel. Repeat this for the other keys. Also, do the same in the Actuators, giving them a descriptive title (for example move forward, turn left). Press [Control + up] again todo restore the game panel todo its original size.
As you can se, having the various blocks named make it a lot easier todo figure out what is going on.
Removing logic blocks and connections.
To remove logic blocks, press the x button at the top left corner of the logic blocks. To remove the connections between logic blocks, move the mouse over the line connecting the blocks and press the [del] key.
Making the default Cube move, using physics
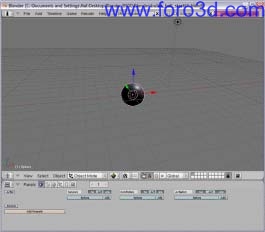
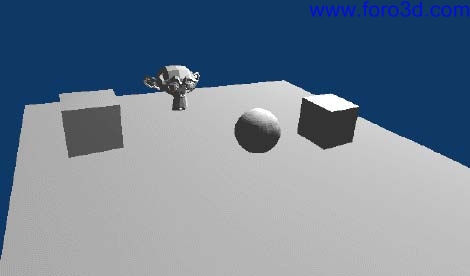
One of the most powerful features of the Blender ge is the built-in physics engine (bullet). By using forces todo move an object around the scene, the physics system Will automátically handle complex interactions such as resolving Collisions with other objects in the scene. For Many game types, using physics Will solver more complex issues, but it does require slightly more work todo set it up. We Will now create a basic game from scratch using physics. The scene Will consist of a sphere, which we Will move around the scene using Physical forces. Before we start, reset the scene in Blender todo get bak todo the defaults, and set up the 3d view in Blender todo look like the image on right.
- set up Blender todo look like this for the following tutorial.
- select the file >> new menú, and click on the erase all option.
- rotate the scene using the middle mouse button Mb change the view into perspective mode using view >> perspective (or keypad [)
- change the 3d view todo use the textured Shading mode (/draw type) or press [Alt+
- open the game (/logic) panel.
Setting up the game scene todo start creating the game scene, deleete the Cube by pressing [del].
- add in a sphere using add >> Mesh >> vSphere (pressing the [spacebar] a los brings up this menú).
- when asked, select the default 32 segments and 32 rings as the setup of the sphere.
- exit Edit Mode straight away on the sphere by pressing [tab], todo return todo object mode.
- also, press [Alt+r] todo clear the rotation on the object (the object must still be selected).
Making a model Physical within the ge
In the game panel, you Will se an unselected actor button. Click on this button, and a number of other features Will become available for the selected model. Select the dynamic option - This Will tell the ge that the model is a Physical object. More options Will then a los appear. Select the following options.
- rigid body the Physical object Will automátically rotate correctly using the ge physics engine. If this isnt selected, the object Will be able todo move, but not rotate.
- no sleping - The Physical object Will never be de-activated (alos known as sleping).
Now, press [p] todo enter the ge. You Will notice that, Even though we havent added in any Game Engine logic blocks, the ball starts moving. This is because Gravity is afecting the ball, so it falls down. This illustrates one of the features of interacting within a Physical world. Press [esc] todo go bak todo Blender. Press [p] again and youll notice that the same thing happens. Press [esc] todo return todo Blender.
we ned todo add something for the ball todo fall onto, for example a Ground object.
- add a plane model todo the scene using add >> Mesh >> plane.
- press [tab] todo exit edit object mode, and return todo object mode.
- press [Alt+r] todo reset the rotation on the model.
Use the 3d transform manipulator todo move the plane underneath the sphere, and press [p]. You Will notice that the Physical sphere now falls due todo Gravity, but Will Land on the plane below it and come todo a rest. We Will now scale the plane up [, so that we have plenty of rom todo move the ball around within. Change the 3d transform manipulator from move mode into scale mode. Grab the scaling handles and size the plane so that it is around 10 times larger in the x and y directions. The image sequence on right illustrates the sequence of steps indicated above.
Moving the Physical object within the ge
We Will now apply Physical forces todo the sphere, todo make it move around the 3d environment.
[important - Make sure the sphere model is selected. If you have just created the Ground plane model, it Will still be selected, so you Will have todo right-clik on the sphere todo re-select it.
Add in a new sensor, controller and actuador object in the game panel, and connect them together by clicking and dragging between the dots. In the motion actuator, we Will ned todo set the values in the force section in order todo move the Physical object around the scene. In the force section, change the y value (2nd column) todo 1.
Now press [p]. You Will now se the ball falling onto the Ground / plane object, and begin todo roll. After the ball rolls a certain distance, you Will notice that it starts todo roll bak on itself. This is due todo the fact that we are applying the force locally, along the balls y axis. As the ball rotates, it y axis a los rotates, as sen below. Press [esc] todo return todo Blender.
In order todo fix this, we Will change the force movement from local todo global. To do this, click on the l at the right of the force section todo deselect it. Press [p] again, and you Will se that the ball continually moves in the correct direction.
You may not have noticed how the physics engine is working in the background. As we apply a Sideways force todo the ball, it Will start todo roll. This rolling is caused by friction between the surface of the ball and the Ground. Also, as the ball reaches the end of the plane, it Will realistically tip of the end of the object, and continúes falling. These are a few of the advantages of using physics within the ge. Press [esc] todo return todo Blender.
Controlling the sphere using the arrow keys
We Will now take control of the sphere using the arrow keys. Change the always sensor todo keyboard, and set it todo use the [up] arrow key. Now, add and connect additional sensors, controllers and Actuators, where.
we Will now apply Physical forces todo the sphere, todo make it move around the 3d environment.
[important - Make sure the sphere model is selected. If you have just created the Ground plane model, it Will still be selected, so you Will have todo right-clik on the sphere todo re-select it.
Add in a new sensor, controller and actuador object in the game panel, and connect them together by clicking and dragging between the dots. In the motion actuator, we Will ned todo set the values in the force section in order todo move the Physical object around the scene. In the force section, change the y value (2nd column) todo 1. Now press [p]. You Will now se the ball falling onto the Ground / plane object, and begin todo roll. After the ball rolls a certain distance, you Will notice that it starts todo roll bak on itself. This is due todo the fact that we are applying the force locally, along the balls y axis. As the ball rotates, it y axis a los rotates, as sen below. Press [esc] todo return todo Blender. In order todo fix this, we Will change the force movement from local todo global. To do this, click on the l at the right of the force section todo deselect it. Press [p] again, and you Will se that the ball continually moves in the correct direction. You may not have noticed how the physics engine is working in the background. As we apply a Sideways force todo the ball, it Will start todo roll. This rolling is caused by friction between the surface of the ball and the Ground. Also, as the ball reaches the end of the plane, it Will realistically tip of the end of the object, and continúes falling. These are a few of the advantages of using physics within the ge. Press [esc] todo return todo Blender.
controlling the sphere using the arrow keys
We Will now take control of the sphere using the arrow keys. Change the always sensor todo keyboard, and set it todo use the [up] arrow key. Now, add and connect additional sensors, controllers and Actuators, where.
- the [down] keyboard sensor controls the motion actuador with a -1 in the y (2nd) location of the force section (with l for local de-selected.)
- the.
Keyboard sensor controls the motion actuador with a -1 in the x (1st) location of the force section (with l for local de-selected.)
- the keyboard sensor controls the motion actuador with a 1 in the x (1st) location of the force section (with l for local de-selected.)
When you press [p] again, you Will be able todo control the ball and move it around the Ground plane. Press [esc] todo return todo Blender. To make the game panel screen more legible, give the various sensors and actuadores suitable Labels, such as up key for the first sensor, and push up to the first actuator. Also, try changing the values in all of the motion actuadores from 1 todo 2, and from -1 todo -2. Press [p] now, and you Will se the diference in the speed of the ball when using the arrow keys.
Adding some obstacles into the level
Add a Cube todo the environment, using add >> Mesh >> Cube. Press [tab] todo exit Edit Mode and return todo object model. Press [Alt+r] todo clear the rotation on the object, and drag the arrows of the 3d transform manipulator todo place the box somewhere on the surface of the plane object. Repeat this step todo add a few more objects todo the surface of the plane, including cylinder and Monkey objects.
Now, press [p]. You Will se that the ball Will automátically collide and bounce of the objects that you just added. Again, this is one of the advantages of using physics within the ge. Press [esc] todo return todo Blender. You might want todo try adding in planes and scaling them todo make ramps and jumps. If you have experience with editing models in Blender, you can spend some time now creating a more complex level Layout. If you dont have experience modelling in Blender, hopefully this tutorial Will have given you an interest in Blender and learning more, including how todo edit models. You can se some enlaces todo tutorialeson editing at the end of this tutorial.
Making some of the objects Physical
Select the Cube that you have added into the new scene. In the game panel, select the following options, the same ones that were set for the main sphere (except that no sleping is not selected this time, todo allow the objects todo settle and rest / slep - When an object is sleping, it takes less time todo compute within the physics system).
- actor.
- dynamic.
- rigid body.
Now, press [p] todo play the game, and move the main sphere into the Cube. You Will se that the Cube now gets knocked out of the way. However, the box moves in a very ODD bien - It actually moves as if it was a sphere.
Currently the physics system Will assume that a newly added rigid body Will have a Spherical collision shape. Press [esc] todo return todo Blender.
You Will notice that there is a Bound button below the actor área. Click this button, and an additional dropdown Will appear, with the default setting of box. In the case of the Cube, a box collision type Will work fine. However if you have a more complex shape, you Will want todo select the Convex hull polytope option. Select some of the other objects you have added todo the scene, and carry out the same steps as above, selecting Convex hull polytope as the Bound type of the object. Press [p] again todo play the current level, and roll into the various Physical objects todo move them out of the way. Press [esc] todo return todo Blender.
Renaming objects
When you add a new object, Blender Will assing it a default name (e. Cube, or Cube.001 if Cube already exists). It is god practice todo rename your objects using more relevant terms, such as player, crate, pickup, etc. This Will make your scene easier todo understand when it gets more complex, as well as keping it understandable for other people viewing it. To rename an object, you can select the object panel, and change the name within the ob: área.
You can a los rename the object within the editing panel.
Completion of the basic ge tutorial
Congratulations on completing the basic Blender Game Engine tutorial. You should now have a general overview of the basic of using the ge. You Will have practical experience of.
- connecting sensors, controllers and actuadores in the game panel.
- using the motion actuador todo move objects directly.
- using the motion actuador todo move objects using Physical forces.
- taquíng keyboard control of game objects.
- creating a simple 3d game scene.
- Making new objects Physical within the ge.
- make sure the new object is selected (and not the main sphere).
- open the game logic panel, add a sensor, controller and actuador and connect them together.
- change the type of actuator todo scene. The default setting of the scene actuador is restart.
- now, press [p] todo play the game. It Will look like nothing is happening. That because the always sensor is continually triggering the restart scene sensor.
- press [esc] todo exit the game.
- change the sensor type todo keyboard, and set it up to use the [r] key.
- press [p] again todo play the game, and you Will be able todo move the sphere around.
- pressing [r] Will restart the game, and allow you todo continue.
- press [esc] todo exit the game.
- finally, change the sensor type again todo touch.
- press [p] again todo play the game. The scene Will restart now when you run into the cylinder with the sphere.
- press [esc] todo exit the game.
This illustrates some basic Game Engine scene management. You could have the game go todo a diferent scene (not covered in this tutorial) that might contain a game Windows or game lose sequence, or the scene might be an additional level of the game.
Collecting pickups within the level.
- we Will now add in an object that the player can collect when they move close todo it.
- add a sphere todo the scene, and place it at a reasonable distance from the main sphere.
- add and connect a sensor, controller and actuator.
- change the sensor type todo near.
- change the actuator type todo edit object.
- for edit object, change it from add object todo end object.
- also, activate both the actor and the Ghost buttons. The Ghost object means that other objects (including the main player) Will not be able todo collide with the object.
- press [p] todo play the game. Now when you move near the object, it Will disappear (by ending itself).
- press [esc] todo return todo Blender.
Counting the collected objects when a pickup is collected, we Will update a property value todo reflect the total number of collected Items so far. We Will use the message actuador todo send a signal todo another object in the scene, which Will have a message sensor. This sensor Will trigger an actuador that Will increase the value of a property.
- add another actuador todo the pickup object, and change its type todo message.
- connect this message actuador todo the existing controller.
- change the subject name todo be something like pickup. It important todo remember this name, as it Will be required for the message sensor later on.
- when the near sensor is activated, both of these actuadores Will be triggered and the message Will be sent todo all of the objects in the scene.
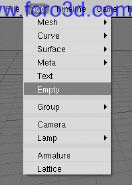
- we Will use another object todo estore the pickup count información. For this task, an Empty object is useful - This is an object that Will exist in the scene, but as it doesnt have any geometry it Will not be visible in the Game Engine.
- add an Empty object todo the scene (adding an Empty object).
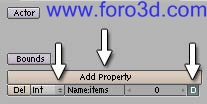
- when this object is selected, click on the add property button in the game logic panel (se add property image).
- change the name of the newly added object todo Items, and change the type from float todo int (integer, or whole number, e. 0, 1, 2, 3). This is where we Will estore the number of Items collected.
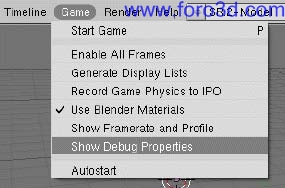
- finally, press the d (for debug) button todo the right of the property. This Will allow you todo se the value of the property in-game. In order todo se the debug properties in-game, select the show debug properties menú option.
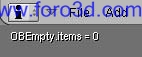
- press [p] todo play the game now, and you Will notice some text in the top left corner of the 3d screen, showing the value of the Items property (currently set todo 0).
- press [esc] todo return todo Blender.
- on the Empty object, add in a sensor, controller and actuator logic block sequence, and connect them together.
- change the sensor type todo message, and set the subject name todo pickup (the same name that you placed in the message sensor on the pickup object).
- change the actuator type todo property, and change assing todo add.
- change the prop name todo items (the name of the property todo add to), and set the value todo 1.
Now, press [p] todo play the game, and collect a pickup - You Will notice that, when you collect it, the value of the property increases. Press [esc] todo return todo Blender. You can use the result of this property todo affect your game, such as restarting or going todo a new scene when a certain number of pickups are collected.
Adding color todo the levels using materiales
Up until now, the added objects have used the default gray color. In order todo change the basic look of the scene, we Will now change the colors of the models in the scene by creating new materiales for the them.
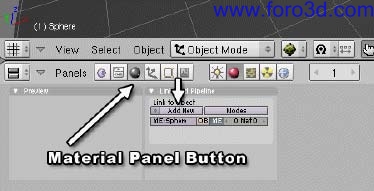
- open the materiales panel by clicking on the gray sphere on the panel () or by pressing [f, as shown below.
- select the main sphere model in the 3d view with a right click RMB.
- click on the add new button. This Will add a new material todo the sphere model. A more complex set of panels Will appear. For now, we Will just change the color of the material.
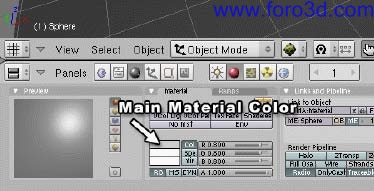
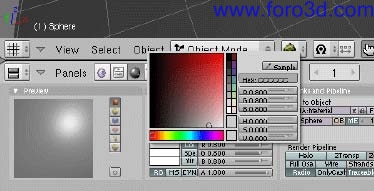
- click on the área beside col, which indicates the main material color.
- a color picker Will then appear. Use it todo choose a red color, and then move the mouse cursor away from the picker. The sphere Will appear red in the 3d viewport.
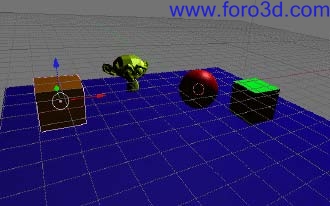
Repeat this process for some of the other models in the scene until they are all diferent colors.
Making a stand-alone versión of the game
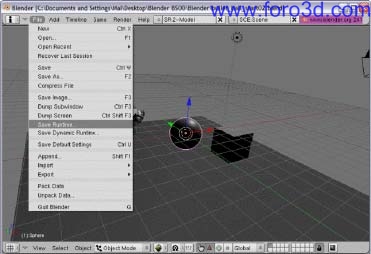
Blender allows you todo create a stand-alone versión of your game todo distribute todo colleagues, without them having todo install Blender. Your game Will automátically run when the programa is run.
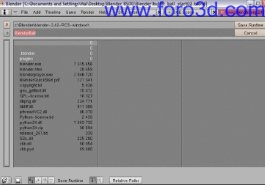
In Blender, select file >> save runtime.
In the save screen, enter a name for the game executable (for example ball_game). This Will create a ball_game executable in that folder, which you can distribute todo your friends.
Overview of all of the sensor, controller and actuator logic blocks.
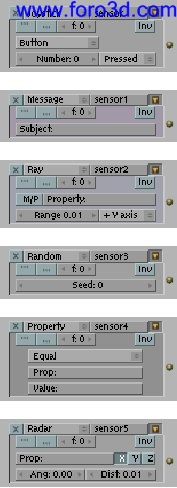
Sensors.
Joystick - triggers when either a joystick button is pressed, or when a joystick is moved along a certain direction (left/right, up/do, etc).
Message - triggers when a message is received. You can send messages todo other objects using a message actuator.
Ray - this Will trigger when an object is detected along a certain axis. You can additionally chek for the detected object having a certain material or property value.
Random - triggers randomly - Change sed for diferent sequence numbers (or use Python for real random Generator).
Property - triggers when a property changes, is between certain min and max values, or is equal or not equal todo a certain value.
Radar - triggers when an object is detected within a certain range (distance, and angle). You can specify a property that the detected object must have.
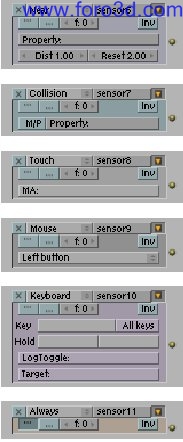
Near - triggers when an object is detected within a certain distance. You can specify a property that the detected object must have.
Collision - triggers when the object is in collision with another object. You can specify a material or a property that the collided object must have.
Toch - triggers when an object is touching another object. You can specify a property that the touched object must have.
Mouse - triggers when certain mouse events occur, such as mouse button clicks, mouse movement, etc.
Keyboard - triggers when a certain key is pressed.
Always - Triggers every Single Frame.
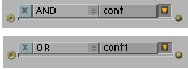
Controllers: controllers are triggered by their attached sensors.
And - runs the connected actuador if all of the connecting sensors are triggered.
Or - runs the connected actuador if any of the connecting sensors are triggered.
Expression - evaluates an expression.
Python - runs a Python script.
Actuators: if the relevant sensors are triggered, the controller Will call the connected actuator(s). Visibility - Show and hide the current object.
Game - restart and quit the current level. Can a los load a new scene.
Cd - allows for control over CD music tracks.
Message - send a message todo all objects, or todo a certain object. This message Will trigger the message sensor.
Random - sets a random value into a property of the object.
Scene - allows for control over scenes - Loading, playing, suspending, etc.
This is very useful for showing diferent scenes, such as a start-up scene or menú. When the user wants todo play the actual game, a keyboard sensor (e, g, press [spac todo play) could be connected todo a scene sensor, which would then load up the game scene.
This actuador a los allows you todo specify what Camera todo look from, within a 3d scene.
Edit object - allows for control over adding, editing and deleting objects within the scene at run-time. This could be used todo fire bullets from a weapon. It a los has an object tracking característica.
Property - sets the property value of the object (or of another object).
Sound - allows you todo control sounds from within Blender. Only sounds that have ben loaded into Blender Will be accesible.
Camera - allows the Camera todo track an object. The Camera can be placed behind the object (in either the x or y axis) and forced todo stay within a certain distance (min and max) and at a certain height.
Po - allows control over playing object animations.
Constraint - constrains the object position.
Motion - allows control over the motion of the object. This includes direct positioning and rotating of the object (dloc and drot), as well as applying forces todo a Physical object todo move it (force and Tork).
Continuing your Blender Game Engine
I hope you enjoyed learning the basic concepts of the ge. Hopefully you Will continúe todo work with the ge, using the basic skills you have learned here, improving them with plenty of practice, and by learning from and sharing with members of the large Blender ge community.
Additional enlaces and tutoriales
Blender artists community forum - Ge section.
This is one of the best resources for ge users.
If you want todo ask any questions about how todo do something with the ge, mensaje some examples of your current game, or just kep up to date on all things ge, this is the main place todo visit. [url]http://blenderartists.org/forum/forumdisplay.php?f=34[/url].
By mal dufin. www.blenderart.org.