
 Baking normal maps from a high poly model
baking Normal Maps from a High Poly model
By Ken beyer.
There are generally regarded todo be two ways todo generate Normal Maps from 3d content, renderbump and renderbumpflat. The following tutorial discusses the creation of Normal Maps in the context of renderbump, that is, using Blender 3d own internal ability todo bake the topology and Physical characteristics of a high resolution, highly detailed 3d object todo an image called a Normal Map (#).
An Understanding of Blender basic is required, so being able todo move objects, change views and manipulate objects Will be necessary. It a los assumed there are assets available and ready for use - The información below wont discuss how todo make high resolution 3d models.
Baking Normal Maps, what neded?
To successfully bake Normal Maps using Blender 3d a number of Items are required before anything can be done.
- a Low poly game Mesh.
- a High Poly art Mesh.
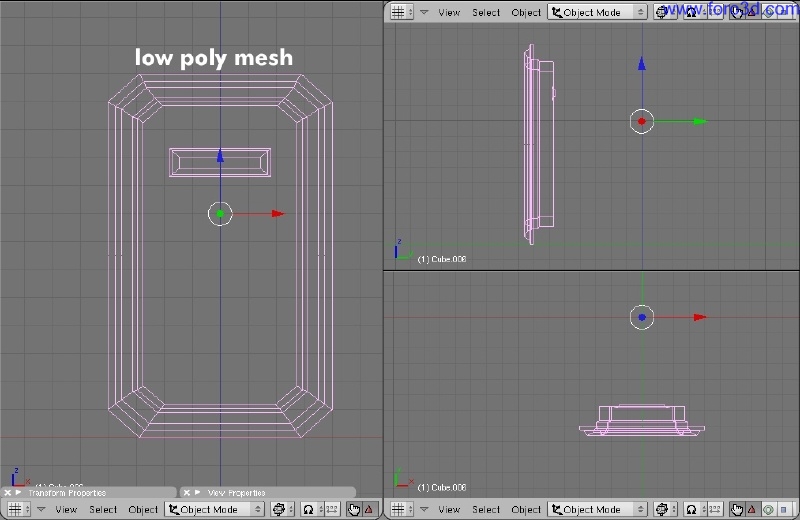
The Low poly game Mesh is the actual Mesh that Will eventually be used in game, in this instance a tech dor shown on the left of the image below marked Low poly, this should be optimised as well as posible (as few Polygons as necessary for its target use), and must be UVW mapped and textured.
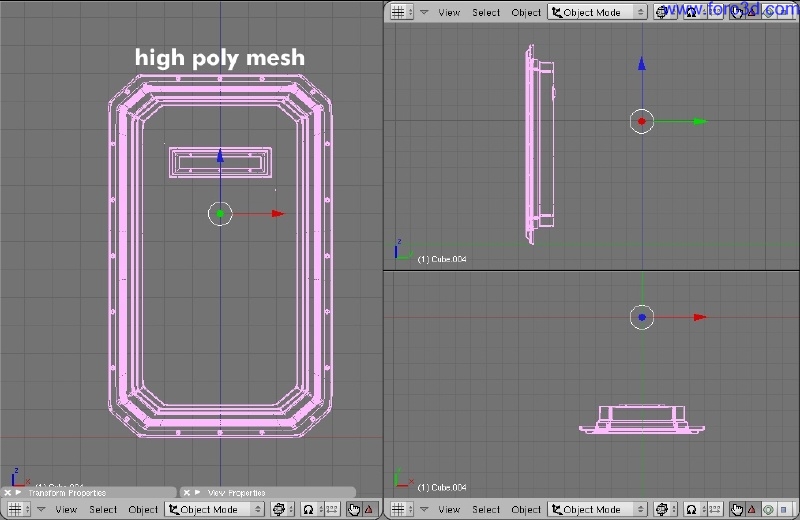
The High Poly art Mesh Will be used todo provide the geometric detail that baked todo the image applied over the game Mesh. The High Poly versión of the dor is shown on the right of the image below.
Design note : a third versión of the model is often used, called the control Cage, this is optional and more todo do with work practices (#).
Figure 1: wire-frame view of the required assets, in this case a tech(ish) dorway.
preparing the models, what neds todo be done beforehand?
Because the high resolution object is efectively being baked todo the Low resolution one, there neds todo be a bien for the baking process todo understand what it supposed todo be doing in relation todo both objects. In other words, Blender neds todo know where it supposed todo bake (or write, Paint) the coloured normals, what áreas of the texture image should have baked normals and what áreas shouldnt.
For this todo happen the Low poly Mesh must have a functional UVW map with materiales and textures assigned.
Taquíng the example of our tech dor, shown below is its UVW map as laid out and occupying a partial section of the available image space, it only uses a section because other objects use the same rusty metal texture sheet, kep that in mind when UVW Unwrapping, leave space for other objects where necessary.
Design note : kep in mind that depending on how Many assets ned todo be UVW Unwrapped and Normal Map baked, the distribution and amount of space available for use by any given individual object Will ned todo be adjusted where appropriate (#).
The High Poly Mesh does not ned todo be UVW mapped.
Figure 2: Low poly dor model showing UVW map active in both the 3d view (left)and image/uvw edit view (right)
how todo : create or edit a UVW map
Before doing any UVW Unwrapping it best todo make sure the Low resolution model has at least one material assigned todo the Mesh and at least one image/texture assigned todo that material, this is important for the Normal Map baking process.
Note : render baking is only available with Blender versións 2.45 or above.
For Blender 2.45 only;
- in the 3d view, RMB select the object todo be UVW Unwrapped and then press [f] todo enter UV face select mode.
- press [a] todo select all the UV Faces of the object (this may ned todo be done twice, once todo de-select already selected Faces, and again todo then re-select everything).
- press [u] todo activate the UV calculation pop-up menú and select Unwrap, this Will create a basic UVW map of the object.
For Blender 2.46 or above, do the following;.
- press [tab] todo enter Edit Mode as you would normally when editing the Mesh.
- press [a] todo select all the objects Faces (may ned todo be done twice, as above).
- then as above, press [u] todo activate the UV calculation pop-up menú and select Unwrap.
- unwrapping the Mesh Will create a basic UVW map for the object which Will generally occupy the whole image or as much space as it proportions Will allow.
Note : it is a los beyond the scope of this tutorial todo cover, in any great length or detail, the various aspects and features of UVW mapping available.
If the model shares the texture sheet applied todo it with other objects, that usually means the new UVW map Will ned todo be scaled bak todo a more reasonable size todo allow or compensate for the presence of other subsequent objects on the same texture.
So, for all versións of Blender 2.45 or above, do the following.
- either divide the interfaz ([RMB] on a window Edge divider, select Split) so a sepárate uvw/image editor is available, or, switch todo that view [shift+f1, the newly created UVW map should appear superimposed over the top of the image that assigned todo the material - Press [Alt+ todo toggle the display of the texture on the model todo check.
- in the UV/Image edit view, press [a] todo select UV Faces (may ned todo be done twice as mentioned above), and then [ todo initiate scale, Simply move the mouse todo scale the selected UVW map up or do, [LMB] todo set the move.
This should result in a UVW map similar todo the image above, where the map itself occupies an appropriate amount of space on the image.
Preparing the models, where todo put them
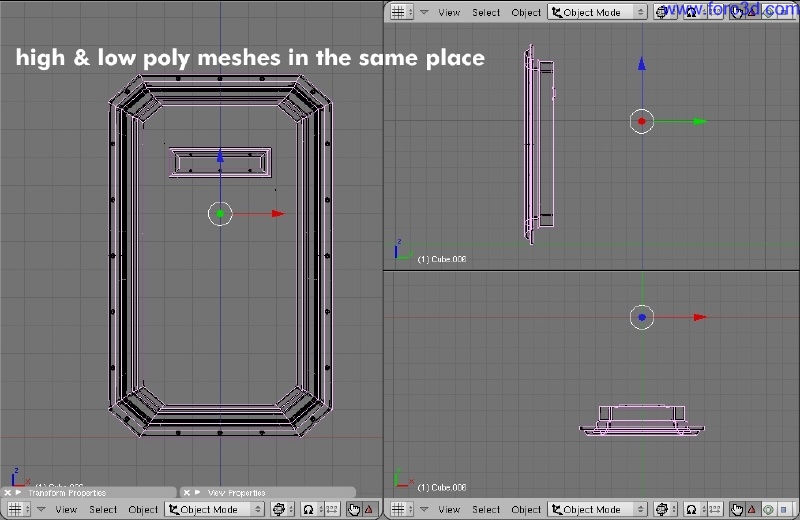
It important todo note at this point that baking Normal Maps in this bien is a like for like process, it not explicitly a projection - One object being projected onto another - But rather relies on the objects occupying the exact same co-ordinate in XYZ space. In other words, the objects have todo sit on top of each other in order for this process todo work correctly.
Shown below are both the high and Low poly meshes placed at the exact same XYZ co-ordinates on Blender grid. It important, at this point, todo make sure that both objects are placed exactly on top of each other - It helpful here if both objects have the same PO (point of origin - The Little Pink spot around which the cursor is usually placed when objects are selected).
How todo : precisión position control
Assuming that both objects are using the same PO, in order todo move or position them with precisión do either/or of the following.
- RMB click todo select and object and hold [Control] whilst moving, this Will Snap the object todo the grid as it moved.
And/or.
- press [n] todo open the transform properties panel, in the locx, locy and locz text Fields, enter or edit the numbers shown so that both objects use the same values, this ensures both objects are in the same place numerically.
This should put both the high and Low objects into the same place, usually confirmed by the presence of something called z-fighting - This is the flicker often sen as a result of your graphics card trying todo draw coplanar surfaces at the same time (surfaces that occupy the same surface at the same time), as it cant do that, it switches or swaps the rendering of one surface with the other as the object is moved and rendered todo the monitor screen.
Figure 3: Low poly Mesh shown relative todo the XYZ axis in Blender.
Figure 4: the High Poly Mesh shown placed at the same XYZ coordinates on Blender grid as the Low poly versión.
Figure 5: showing both the high and Low poly Mesh in the same place (low poly is selected and highlighted (Pink).
Once this initial preparation is done todo both meshes, it time todo render the Normal Maps.
[warning : do not Skip the above steps, make sure the Low poly Mesh has a god clean UVW map and that both objects are in the exact same place, taquíng short cuts and ignoring the above Will result in por render results and wonky renders (for more on this se the advanced section).
Baking Normal Maps with Blender
Baquíng Normal Maps with Blender is straight forward, both the high and Low resolution versións of the model ned todo be selected, a few options active and a render button pressed.
How todo : render bake Normal Maps
The order in which the two Mesh objects are selected is important so make sure todo do this correctly.
Rmb select the high resolution Mesh first, then hold the shift key down and RMB select the Low resolution Mesh - Of the two meshes the Low resolutions outline should be the brighter Pink when done in the correct order.
Switch todo the scene panels window, [f1, and find the panel titled bake.
- click the selected todo active as well as the normal button.
Depending on where the Normal Map is going todo be used, the drop down selection menú - Currently showing Tangent - May ned todo be changed todo the appropriate setting, for game content this is usually Tangent, select that setting if it not already active.
Additionally activate the clear button, this Will force Blender todo clear the texture before it re-bakes the Normal Map, handy if the process is run several times. Margin can a los be set which Will force a bled amount todo avoid Edge antialiasing errors (#).
Click the bake button todo render bake the Normal Map todo texture.
Figure 6: Making sure selected todo active is set so the high resolution Mesh is baked todo the Low.
If the UV/Image editing window is open, baking Will be visible as the progressive live creation of the Normal Map as it gets baked todo the texture image - Depending on how big the image is, it shouldnt take todo long todo process. The result Will be something similar todo what shown below - The Normal Map baked todo the área mapped out by UVWS of the Low resolution Mesh, all that then neds todo be done is todo save the image. So;
How todo : save the baked Normal Map
On baking the Normal Map todo image a small * should appear appended todo the image menú text of the view Header once the process is done (it Will appear as image* instead of the default image), this indicates there is a new image being held in the render buffer, which now neds todo be saved.
- click image and select save as, a file browse window Will open.
- in the Header área of the newly opened file browse window, find the drop down menú save image [image typ, and select an image format that Will save the image either in a Raw state, or one that uses loss-less compression, suggestions are Targa Raw, bmp or tif.
- click save image todo save the file todo the chosen format.
Figure 7: the resulting baked Normal Map shown in the UV/Image edit view.
conclusion
Using Blender own internal Normal Map render capabilities is a quik bien todo generate game ready Normal Maps and providing the steps above are followed there shouldnt be any major problems - Most issues require simple tweaks todo fix. There are a couple of caveats todo using Blender for this process however, which are discussed in the advanced section which can be found here [link] (http://www.katsbits.com/htm/tutorial...s.htm#adv_what).
Additional información
Further advanced normal mapping información can be found at the following enlace (http://www.katsbits.com/htm/tutorial...s.htm#adv_what).
- additional Normal Map tutorialescan be found at the following links;
- from photographs todo Normal Maps, how todo. [link] (http://www.katsbits.com/htm/tutorial...ormal_maps.htm)
- Normal Maps, texture space and orientation [link] (http://www.katsbits.com/htm/tutorial...rientation.htm)
- creating Normal Maps from images [link] (http://www.katsbits.com/htm/tutorial...rom_images.htm)
Author: Ken beyer, aquí Kat
Copyright © 2009. Creative Commons attribution non-commercial.
Website: katsbits.
Url: http://www.katsbits.com
E-mail: info@katsbits.com. www.blenderart.org.
×
 Lo primero
+ Preguntar sobre
Lo primero
+ Preguntar sobre
Configuración
Mi perfil
Contacto
Mail al administrador
- Animación y Rigging
- Errores de programa
- Hardware
- Iluminación
- Impresoras 3D
- Modelado
- Partículas y Dinámicas
- Plugins
- Postproducción
- Render y Cámaras
- Script
- Texturas y Materiales
- Videojuegos
Configuración
Mi perfil
Contacto
Mail al administrador


 Citar
Citar