
baking light projection and shadows Blender v2.46
By mackraken.
In this tutorial we Will bake light projection and shadows on a rom. This is a bien todo emulate an objects shadows. This method doesnt work if the object or light is moving.
setting up the scene.
1.-open Blender into a new scene.
Lets get that default box todo be our rom Walls. Select the box, bring up the transform properties Windows (n key). Insert these values for each object.
Now we have our rom, light and Camera in place. Lets add some objects, a UV sphere and a cone and set up these transformations:
We Will change the sphere and cone color by creating two materiales.
Select the sphere and hit f5 (shader section) select add new and add pure red using the RGB sliders RGB(1,0,0). Do the same for the cone but change todo a diferent color, try blue RGB(0, 0.5, 1).
One last thing: the Cube`s normals are looking outside, so if we preview our scene we Will not be able todo se the Walls. Lets fix this by selecting the Cube, changing todo Edit Mode (tab key), selecting all (a key) and pressing Control+F for face specials menú. Select Flip Normals and exit Edit Mode (tab key again). Now the Cube rom is ready.
Ok, our scene is done.
2.-setting up the Walls for baking.
Now we Will create a UV calculation for every face inside the Cube. In order todo do this we Will Split the 3d viewport todo se the UV/Image window.
- at 3d view:
- select the Cube.
- enter Edit Mode (tab)
- select all inside (a)
- press u (uv calculation menú) and choose Lightmap uvpack
Press new image and 1024 for image size. 512 would a los be fine. It important todo select new image only the first time we are doing this calculation. If we ned todo calculate the uvs again deselect this option.
Ok. We have a new black coloured texture for our Cube and the UV coordinates.
Exit Edit Mode.
Press f10 todo go todo render options and go todo bake menú.
Select our Cube if not selected, press the bake button and voilá. We got a nice, shadowed rom.
The baked texture must be saved. If you save your scene and quit, you Will lose the bake, so in the UV editor, select image-> save, or pack todo include the image in the.blend file.
You can improve your shadow quality by selecting the light, hit f5(shading) and increasing software size, samples and threshold.
If you ned todo change your light properties (location, color.) you Will have todo bake again as we just did.
Bge capture before baking
Bge capture After baking.
Some last tips:.
You can animate your Camera inside the rom by changing the UV/Image window todo the ipo curve editor.
Go todo frame 1, select the Camera, press (i key), and select locrot todo make the first key.
Advance about 100 frames.
With the Camera selected, press (shift + f) fly mode, use the w,a,s, and d keys todo move your Camera, and click the LMB when you are satisfied with the view.
Press (i key) and select locrot again.
Insert as Many keys as you like, once you are finished, hit f4 todo go todo the logic panel.
Add a sensor, controller and actuador and set up like this (Camera selected).
Ok that all, oh, and press p todo preview.
Going further:.
I wasnt satisfied with the dark shadows and their quality, and thought that Will help todo understand how Blender light works. For a deper información about this matter por favor refer todo http://download.blender.org/document...spotlight.html by olivier saraja.
Ok, lets go on:
First we are going todo subdivide the Cube a Little. This is for adjusting the margins when we have more complex meshes todo be baked.
- select the Cube.
- enter Edit Mode (tab key)
- select all (a key)
- press w for specials menú.
- select subdivide.
- subdivide once more.
- exit Edit Mode.
Now lets light em up.
Nowadays, the Lamp light can cast shadows but you cant work with them. We Will use spot lights which are more configurable todo cast shadows for our objects and emulate the shadows cast by our Lamp light.
In order todo do this:
First select the Lamp and disable ray shadow. Now we dont have any shadows.
With the Lamp selected, press shift+d todo duplicate and without moving the mouse press LMB, so we have the duplicated light at the same exact position as the original one.
Because it Will be hard todo select one or the other light, change the UV/Image window todo the outliner.
Within the outliner, select the Lamp.001 and go todo Lamp options.
Change the selected Lamp button for spot. We can se we have more options now.
If all goes well the spot Will be heading for our red sphere. If not, just rotate the spot todo do that.
With the spot selected hit Alt+d todo create an instance. Without moving the mouse LMB again. We do this because we want the same shadow intensity on both objects.
Rotate Lamp.002 todo head toward the cone.
Now select only shadow for this Lamp.002. Because Lamp.001 and Lamp.002 are instances the options changed in one light Will change the other todo.
Hit f12 todo preview the scene.
We should have something like this.
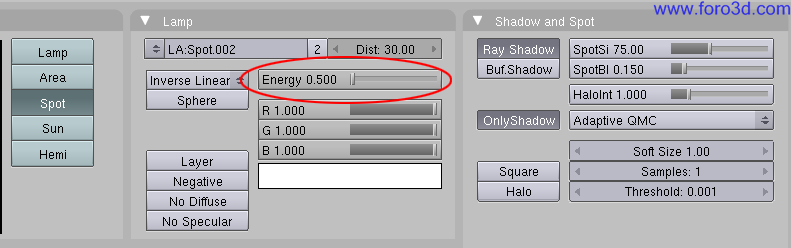
Ok, we Will handle our shadow hardness by controlling the spot energy. Lets try 0.5
Hit f12 todo preview the shadows. It sems much better now.
Lets bake the Cube again todo draw our new shadows on the wall. Press p todo preview in real time. This is much better now, but if we are todo close todo the objects we can se that they dont have enough resolution.
Samples = 1 samples=16.
Max the lights samples todo 16 and bake again.
You can try diferent values at shadow and spot section todo get the desired effect.
Dont forget todo save or repak the baked image before quitting Blender.
Ok, that truly all.
Any questions mail todo me at mackraken2023@hotmail.com.
Chers.
www.blenderartsorg.
.
×
 Lo primero
+ Publicar sobre
Lo primero
+ Publicar sobre
Configuración
Mis mensajes
Contacto
- 🎪 Actividades y Eventos
- 🎭 Animación y Rigging
- 🟦 Blueprint
- 🔬 Ciencia
- 🎬 Cine y TV VFX
- 📸 Fotografía
- 🖥️ Hardware
- 💡 Iluminación
- 🎨 Ilustración y 2D
- 🖨️ Impresoras 3D
- 🧱 Modelado
- 📰 Noticias
- 💥 Partículas y Dinámicas
- 🧩 Plugins
- 🎞️ Postproducción
- 🛠️ Programas General
- 📷 Render y Cámaras
- 🧵 Texturas y Materiales
- 🎮 Videojuegos
Configuración
Mis mensajes
Contacto


 Citar
Citar