
using the sequence editor todo get out of Hot water
By Sandra gilbert.
Do you know what today is? Has got todo be the one sentence everyone dreads. It generally heralds you getting into very Hot water with someone you care about, over a special occasion you had no excuse todo forget. And while the occasion forgotten can be anything from a birthday, anniversary, mother day, father day todo international all about me day, the end result is the same, you are in very big trouble. It no longer Matters that you had planned todo do something special, whether you were going todo create the most stunning image then frame and matte it, or produce the perfecto animation todo commemorate the occasion. Because you obviously got smacked up along side the head with a really big whops, y forgot all about it stick. Well not todo worry, all you ned is a couple dozen photos/images, an appropriate song, Blender sequence editor and a couple of hours.
An often overloked característica, Blender sequence editor is a flexible place for editing your video/animation footage. You can review your video/animation and Stitch together diferent scenes or sections. There are built-in as well as plug-in effects you can use todo smoothly transición from one sequence of your video todo another.
Even less well known is that the sequence editor can a los be used todo make a quik and easy slide show. Which is what we are about todo do. And quite honestly, it really couldnt be any easier.
- first Gather up about 2-3 dozen photos (or images) of your choice and an appropriate song. Ok, here we go.
- change your screen Layout todo the sequence configuration (fig1). Now todo add your images.
- in the vse window, add->images and right-clik each of the pictures that you want todo include. If you want todo include more than one at a time, just hold down the right button and drag the mouse over their filenames.
- when they are all selected, click the select images button and drag and drop the strip todo start at frame 1. (if you choose more than 1 image todo add, Blender combined all your images into one strip)
- set your end frame todo the end frame of your strip (the number of images selected).
- in the scene-render buttons, set your frames/second todo 1 (format panel) and choose an.avi or.mov format. This Will generate a video that shows each image for 1 second.
- if you want the slides todo play longer than 1 second, you can press y todo sepárate the image strip into individual image sequences, a pop up dialog Will ask you how Many frames todo make each image (at 25 fps, enter 125 for a five second showing of each image, for example). You can then arrange and re-arrange the individual slides however you want.
- enter your output filename (output panel), enable do sequence, and click Anim.
Pretty darn easy. But maybe just a Little boring. Let add that song you picked out.
- go bak todo the add menú and this time select audio (Hd), browse todo your song and select it. Wav format is best.
- drag it todo an Empty channel and line it up with your images.
- in the render format panel, choose FFMpeg. (fig2)
- an additional audio panel Will appear, (fig3) make sure you select the Multiplex audio button, or your sound wont be included into your slide show.
Okay now we have audio. If you still have a Little time todo spare, you can add transicións between each image. There are a number of built-in transicións we can use.
- 1 add effect
- 2 subtract effect
- 3 multiply built-in effect
- 4 cross and gamma cross.
- 5 alpha over, under, and over drop built-in effects
- 6 wipe built-in effect
- 7 Glow built-in effect
- 8 transform built-in effect
- 9 color Generator built-in effect
- 10 speed control built-in effect.
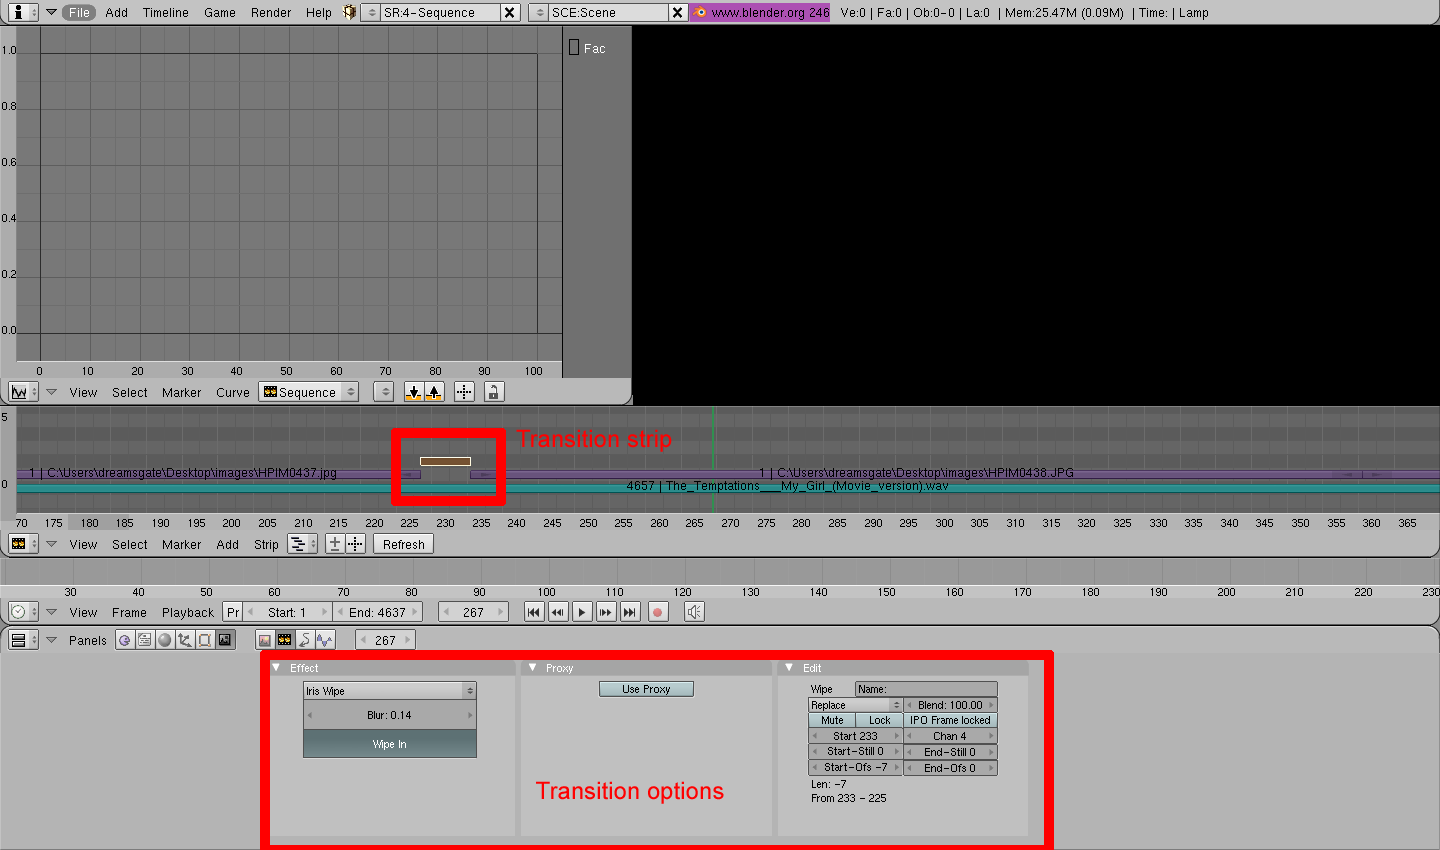
Let go with the wipe effect. There are four diferent wipe effects available.
- clock: like the hands of an analog clock, it sweps clockwise or (if wipe in is enabled) counterclockwise from the 9:00 position. As it sweps, it reveals the next strip.
- iris: like the iris of a Camera or eye, it reveals the next strip th rouge an expanding (or contracting) circle. You can blur the transición, so it looks like INK bleding th rouge paper.
- double wipe: starts in the middle and wipes outward, revealing the next strip. It can a los wipe in, which means it starts at the outside and works its bien toward the middle. You can angle and blur the wipe direction as well.
- single wipe: reveals the next strip by uncovering it. Controls include an angle control so you can start at a corner or side, and blur the transición.
To use an effect that makes a transición between two strips such as the wipe effect, you must box select or shift-right-clik two of them. When you add the effect strip, it Will be placed in a channel above the two images in Grab mode (clik todo drop it on a channel). Its duration Will be the overlap between the two strips as a máximum.
You can choose which wipe effect you want, as well as set the options for it in the Sequencer buttons panel. (fig 3)
Now, once you have added as Many transicións as you want, go ahead and render it out. Two important options todo remember before rendering:
- select the do sequence button
- select the Multiplex audio button
Depending on how Many images, length of song, number of effects and render options you used, you should have your slide show within just a couple of hours.
This Fairly simple Project, while only a slide show, shows just how easy it can be todo use the sequence editor. Now, granted, there are far more options available than we used and when used in conjunction with compositing nodes, the sequence editor is capable of producing profesional movies and animations with all the polish and pizazz of Hollywood. For more información on how todo use the sequence editor, visit the blenderwiki.
-- IMÁGENES ADJUNTAS --
×
 Lo primero
+ Publicar sobre
Lo primero
+ Publicar sobre
Configuración
Mis mensajes
Contacto
- 🎪 Actividades y Eventos
- 🎭 Animación y Rigging
- 🟦 Blueprint
- 🔬 Ciencia
- 🎬 Cine y TV VFX
- 📸 Fotografía
- 🖥️ Hardware
- 💡 Iluminación
- 🎨 Ilustración y 2D
- 🖨️ Impresoras 3D
- 🧱 Modelado
- 📰 Noticias
- 💥 Partículas y Dinámicas
- 🧩 Plugins
- 🎞️ Postproducción
- 🛠️ Programas General
- 📷 Render y Cámaras
- 🧵 Texturas y Materiales
- 🎮 Videojuegos
Configuración
Mis mensajes
Contacto

 Citar
Citar