
realistic smoke in Blender. By françois grassard aquí coyhot.
Introduction.
Like any other atmospheric effects, creating realistic smoke is not an easy task. Every kind of smoke requires diferent techniques. If you ned todo simulate cigarette smoke, chek out the wonderful tutorial of meltingman in this blenderart issue. It a really easy bien todo do it with convincing results. But when you ned todo simulate a more dense smoke, you have todo choose another technique.
Of course, the best tool you could use for that is based on fluid simulation for creating motion and voxels for rendering. For instance, LightWave provides a powerful tool named «hypervoxel» todo achieve this kind of effect. Because Blender doesnt have those features and because voxels rendering can be a time consuming process, we have todo choose another method. For several years, CG artists working in the special effects industry have ben using particle systems. Controlling the particles flow is not the hardest part, the most dificult part is rendering it. How Many particles do you ned todo create realistic sand movement like the Spiderman 3 scene «Birth of Sandman»? Another example : you have todo control billions of particles when you want todo simulate an Avalanche, how do you render each snowflake and give it the right Shading?
For all these kind of effects, such as clouds, smoke, tornadoes, waterfall, sand tempest, Burning meteorite, plane crash, explosión, and more, you can used a wonderful technique called «sprites», or «billboards» in Blender. Let se how todo use them.
A) creating the emitter and textures :
Step 01: create a new add >> Mesh >> plane, then leave the Edit Mode using the tab key if neded.
Step 02: press Alt+r and Alt+g keys todo place the plane at the center of the world.
Step 03: press the n key todo show transform properties in a floating window. Set scale x, y and z todo 0.725 and Loc x todo -4.
Step 04: press the tab key todo switch todo Edit Mode and press the a key todo select all vértices.
Step 05: press the u key and choose Unwrap todo generate UV coordinates. If the emitter does not have UV coordinates, billboards wont be displayed correctly. Press tab again todo exit the Edit Mode.
Step 06: in a buttons window, press the f5 key todo switch todo the Shading panel, select the plane and click on add new todo assing a new Shader todo your object.
Step 07: in the Shading editor, chek Shadeless todo make your smoke visible, Even if there no light in your scene.
Step 08: chek the ztransp button todo activate transparency without using Raytracing and set the a (alpha) value todo 0, using the texture transparency instead of global alpha.
Step 09: press the f6 key todo show the textures panel.
Step 10: click on one of the blank buttons and press add new.
Step 11: set the texture type todo clouds and set noise size todo 2, noisedepth todo 6 and rename your texture todo smoke_color.
Step 12: once again, click a new blank field, press add new, choose clouds as the type and noise size todo 1.3 and noisedepth todo 6. Rename this texture smoke_alpha.
Step 13: show the UV/Image Editor todo Paint a new texture and create an image >> new.
Step 14: set width and height todo 512, defining the size of the new texture and press ok.
Step 15: press the enable painting texture button of the Header of the UV/Image Editor todo activate the Paint mode and press n and c keys todo show the image Paint and image properties palettes.
Step 16: use the Paint tool todo create a random white shape, but dont touch the Edges of the image. They have todo remain totally black. While painting you can press the Airbrush button todo Paint continuously.
Step 17: once your texture is finished, name it smoke_mask and chek the pak into blend button. Blender Will ask if you want todo repak this texture as a (*.png) file, just click on it.
Step 18: get bak todo the Shading editor using the f5 key.
Step 19: click on the texture tab, click smoke_color and switch todo the Map Input tab.
Step 20: chek the UV button, click on the map todo tab and chek color. Unchek any other button if necessary.
Step 21: click on the Purple color and set it todo white.
Step 22: get bak todo the texture tab and select smoke_alpha. In Map Input, chek UV then in the map todo chek color and alpha (be careful, dont chek the alpha button twice otherwise the transparency Will be inverted).
Step 23: click on the Purple color and set it todo black.
Step 24: get bak todo the texture tab and select smoke_mask. In Map Input, chek UV and in the map todo tab chek only alpha.
Step 25: set the Purple color todo black and change the mix mode todo multiply.
B) animate your particles flow :
Step 01: select the emitter object (here, the plane) and press the f7 key several times until the particle panel appears.
Step 02: click the add new button todo create a new flow, named «psys».
Step 03: for initial velocity, set normal and random speed todo 0.5.
Step 04: in Global Effects, set the acceleration parameter Accx todo 7, Accz todo 3 and Brown todo 15 (really useful todo have a nonlinear motion).
Step 05: now you have todo create a new Camera, because we are going todo use the famous particle type named billboard.
Step 06: in the visualization panel, set the particle type todo billboard. Billboard, aquí sprite is a simple square always facing the Camera (that why you have todo create a Camera todo refer to).
Step 07: chek the loock button todo kep all billboards parallel todo avoid intersection between them.
Step 08: set the tilt (rotation value, which sems todo be expressed in radian unit) todo 0.015 and set the Rand value todo 0.4 todo give each billboard a diferent angle at Birth.
Step 09: in the particle system tab, set the amount value todo 300, end todo 200 and life todo 75, or a Little bit more, until your billboards go of-screen when you look th rouge the Camera.
Step 10: save your scene somewhere on your hard drive. Im not kidding, it really important.
Step 11: click on the bake tab, just next todo the present one and click on bake. A new directory is created next todo the.blend file you saved on your hard drive, (do you understand now why it was so importantí), filled with a bunch of files (one per frame) where all particles data is estored. Fyi : once your data is baked (or cached in other words), you can still edit all parameters that wont affect the particles motion (like size, color, transparency, children).
C) animate the billboards twist and size :
Step 01: now that your particles flow is baked, select the emitter object (here, the plane) and switch todo the ipo editor.
Step 02: click on the show ipo type combo list and choose particles. Now you can se diferent particles parameters on the right of the editor.
Step 03: click on btilt (meaning billboard tilt). This parameter is used todo rotate the billboard according the Camera view and particles age.
Step 04: press Control key, and click with the left mouse button around the coordinates 0.0/0.0, adding a new point (use the right mouse button if select with left mouse button is set in your Blender preferencias).
Step 05: once again, create a new point around the frame 200 with a value of 2.0.
Step 06: tweak the tangents knots todo Mimic a Logaritmic curve.
Step 07: click the size parameter, on the right of the ipo editor, and create a new point at 0.0/0.0 as the same bien youve done for the btilt parameter.
Step 08: add a new point around frame 200 with a value of 20. Leave the default interpolation unchanged. Now if you press play you can se your billboard growing and twisting along the animation.
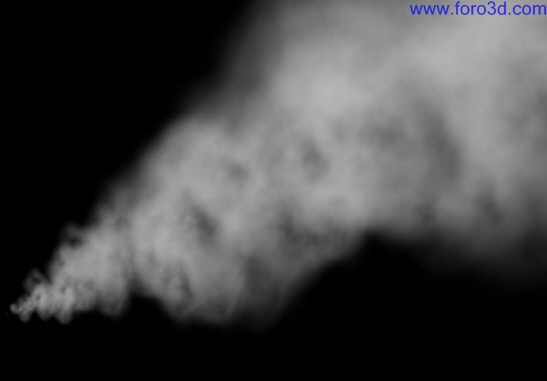
Step 09: press f12 todo start render and se what happened. Yes, now you have heavy and dusty smoke.
D) enhance your render with compositing :.
Step 01: ok, now your smoke looks realistic but looks todo flat and neds more details and contrast. So, just open the Node Editor and press the composite nodes and use nodes buttons.
Step 02: if you have no render layers in your composite Graph, add a new one vía spacebar >> add >> input >> render layers.
Step 03: create a new spacebar >> add >> output >> composi te node and a new spacebar >> add >> output >> viewer.
Step 04: create a new spacebar >> add >> distort >> displace, plug the output parameter image of the render layers into image and Vector of the displace node.
Step 05: set the x scale and y scale of the displace todo 20. The displace is used todo give todo the smoke a more fluid motion.
Step 06: create a new spacebar >> add >> filter >> filter and set it todo kirsch mode.
Step 07: plug the output image of the render layers todo the image input of the kirsch node.
Step 08: set the FAC of the kirsch todo 1.0 if neded. Kirsch is used todo generate additional details that Will be mixed todo the original render.
Step 09: create a new spacebar >> add >> color >> mix, plug the image output of the displace todo the first image input.
Step 10: plug the image output of kirsch into the second input of the mix, set the FAC value todo 0.15 and click on the a (alpha) button.
Step 11: create a new spacebar >> add >> filter >> blur and set the x and y parameters todo 2. This blur is used todo give todo the smoke a softer look.
Step 12: plug the image output of the mix into the image input of the blur node.
Step 13: add a spacebar >> add >> filter >> Glare node. Set it todo Fog Glow mode and plug the output of the blur node into this single input.
Step 14: set the mix value todo 0.15, threshold todo 0.40 and size todo 9. Now your smoke looks more contrasted, visually increasing the density.
Step 15: todo finish, plug the Glare output into composite and viewer.
Step 16: in the buttons window, press f10 key todo switch todo render settings and chek do composite.
Step 17 : set the output Path where you want todo save your rendered frames and press Anim todo render your animation.
Conclusion.
With billboards, you can achieve a lot of wonderful and realistic effects. A standalone piece of software called «Particle Illusion» (http://www.wondertouch.com) is a sprites based special effects tool, working exactly the same bien as Blender billboards, but in realtime (im waiting for all the developments created by the Apricot Project, especially GLSL support in the 3d view that Will make posible the visualization of the billboards in realtime, with Shading and alpha). Take a look at this incredible tool, it Will certainly give you some ideas of what is posible with this technique. The next step is todo provide Blender the same kind of libraries available with «Particle Illusion» todo easily create those effects, like a scene containing several psys (smoke, waterfall or fire), accesible by any emitter in the scene and imported vía file >> «append or enlace».
Make your own libraries and share them with everyone :
All the particles effects could be collected in a single website, like www.blender-materials.org for instance and available for everyone. Together, we can make it. So, lets play with billboard and particles and enjoy.
By françois grassard. www.blenderart.org.
×
 Lo primero
+ Publicar sobre
Lo primero
+ Publicar sobre
Configuración
Mis mensajes
Contacto
- 🎪 Actividades y Eventos
- 🎭 Animación y Rigging
- 🟦 Blueprint
- 🔬 Ciencia
- 🎬 Cine y TV VFX
- 📸 Fotografía
- 🖥️ Hardware
- 💡 Iluminación
- 🎨 Ilustración y 2D
- 🖨️ Impresoras 3D
- 🧱 Modelado
- 📰 Noticias
- 💥 Partículas y Dinámicas
- 🧩 Plugins
- 🎞️ Postproducción
- 🛠️ Programas General
- 📷 Render y Cámaras
- 🧵 Texturas y Materiales
- 🎮 Videojuegos
Configuración
Mis mensajes
Contacto


 Citar
Citar