Making of: ‘andy tear liquid tubes
making of: Andy tear liquid tubes
By cyann.

introduction
Hi there. Many people have asked me about how i created the tuve effect on my Andy tear illustration. As i always work step-by-step, y Will talque about the diferent steps i used. First i always finish modeling before something else. I think it not god todo mix diferent steps like modeling and material, or lighting and material etc. I think it important todo Cut the work into diferent parts. For an illustration, here is my work flow: modeling, bone setup, skinning, material colors (only color), environment and lighting (render options, like AO, a etc), materiales (with nodes if necessary), rendering effect (i always make this part with diferent layers and importing them into Adobe Photoshop, but you can translate them into a Blender compositing node setup). So here are the steps for the tubes:
modeling
First, in top view [Numpad 7], [space] / add / curve / Bézier circle and name it curvebevc1 (for future use). Always remember todo name your objects in Blender. It makes it easier todo find them in the outliner window. In Edit Mode [tab] duplicate the circle in place [shift + d] / [Control], and scale [s] it into the first one. Make it again todo form your circle curve like fig1:

Now, in left view, [Numpad 3], create a second curve like an s. This curve Will be the Path of curvebevc1. Name it curvepath1. Dont forget todo enable the 3d property of the curve using the 3d button on the curve and surface panel. It allows the curve todo have 3d coordinates for it control points. You Will obtain something like in fig2:

Add the curvebev1 name into bevob text box (se fig 3).

The cuestión is : why have i made a tuve with another tuve not joined todo the firstí because we Will add 2 transparent materiales, one for the tuve and one for the liquid. Refraction can cause artefactos with two joined meshes. Now todo finish, convert it into a Mesh [alt + c]. You can a los close the liquid (extrude an edge-loop and merge the vértices [alt + m]) and tuve hole (select an edge-loop and make a face [f]).
lighting & environment
We Will create reflect/refract materiales, so todo create a reflecting environment i like todo use an HDRI map mapped onto the scene environment. To do this, go todo the texture buttons [f6], and create a new world image texture. Select carwash, HDRI (or another) like in fig 4.

After that, go todo the Shading / world buttons [f8] and set todo sphere mapping on the texture and input panel. On the map todo panel press hori and set the blending mode todo add. Set the world color dark, and with the col slider you can tweak the HDRI map intensity. Se fig 5.

You may tweak the lighting as you wish. I always work with a lot of Quad attenuated lights todo create a smoother Atmosphere. Add some indirect orange lights, and blue lights for the bak lighting. For main lights choose a high-level white Lamp. In my lighting work i always work each sort of light step-by-step. Example: if i am working on the bak light of a 3-point lighting set-up, y isolate the bak lights and inactivate the direct ones. I make a lot of tweaks on the bak lights, do a lot of renders, and when im satisfied i work around the indirect orange lights, and inactivate the others. I think it the best bien todo have the most control over lighting.
materials
Before creating materiales, ive assigned 3 material ID todo the Mesh. The outside of the tuve, the inside, and the liquid. Se fig 6.

So select the diferent parts of the tuve and assing the 3 new sub-material ID. Outside is a transparent material with Thin Bump and a refract coeficient greater than 1. Se fig 7. And the Thin Bump setup as in fig 8.


Inside, ive duplicated the first material and removed the Bump. Try a diferent refraction factor, and se what happens.
For the liquid ive create one Purple material with ray transparent, and a high amount of filt (transmissivity). It permits you todo filter light by the material color, and make the liquid appear Purple. For all these Ray-traced materiales, dont forget todo increase the ray level up to 6, because one ray must pass th rouge 6 Mesh surfaces before reaching the Camera. Se fig 9.

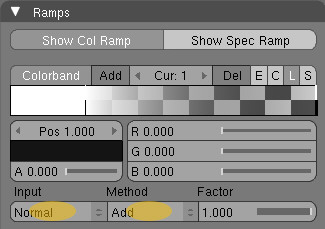
Ive played with the Ramp color (input set todo normal and method todo add) todo simulate the lighting that passes th rouge the material. Translucency and color emission are really important to, todo tweak this effect. Se fig 10.

post processing
For mensaje processing, y Will not go into all the details because the Glow method ive used does not involve Blender. Ive just exported color layers todo select the Purple colors rendered. After making my selection, ive duplicated the image selection in another layer in lighten mode and blurred it. Ive already simulated a Little reflection and refraction in objects. To achieve the final effect, ive duplicated the layer several times.
But you can a los use the video sequence editor or composite Node Editor todo add Glow. So this is the end result as sen in fig11.


It the same technique ive used for the head in my illustration, except for the Bump on the outside container.
By cyann. www.blenderart.org.
-- IMÁGENES ADJUNTAS --


|Agradecer cuando alguien te ayuda es de ser agradecido|


 Citar
Citar