
 Making of clep
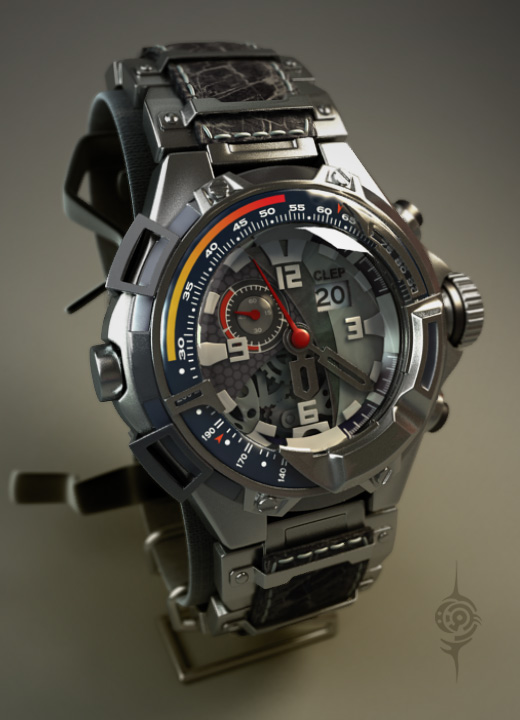
introduction hello everyone. Clep is one of my latest projects and here im gonna explain some techniques that i used todo create this image, todo create this Project, y neded a basic main idea of what i wanted todo show. I wanted todo create a clear scence focused on one thing, all the magic Will be done only by this object. The beggining was todo make its design, a god bien todo make god designs is todo have a lot of visual referencias, use them with the creativity, and start todo mix things up in the mind finding new ways todo show what already exists. Anyway our brains interprets visual Stuff relating it with things that they have sen before. at Google i could find a lot of reference todo start with, it god todo save a lot of them in the PC todo have them near todo watch.
Now with this i started drawing some rouge strokes. Honestly im not a god drawer at all, but that doesnt have todo be a limitation. Anyway is very necesary todo have very clear the ideas in a piece of paper not matter how badly theyre drawn. Sometimes some Stuff that works pretty fine on paper may not work very well on 3d, so this could change during the process, a los because a change of mind or something else, so it not god todo be afraid todo make changes todo try todo get a better looking. this drawing was pretty easy todo draw, because all those circles, y just used a compass.
modeling in modelling i try todo be respectful with proportions, theyre very important, all the 3d volumes and its esthetic depends on these proportions, the main skill of a god modeler is todo be able todo figure out how todo build 3d models with god porportions, in Organic Modeling this ability could be called alos as sense of anatomy, in inorganic it could be called a god sense of geometry. This artistic eye could be developed by practicing modeling trying todo get lookings as similar todo real shapes as posible. The remaining skills, the technique, are easier todo get, but not less important. i usually use the same technique todo model inorganic pieces. I start with a primitive creating a basic shape, next making the details and finally defining out hard Edges, this last one are very important. in the real world is dificult todo se surfaces with perfecto Edges, Even most of objects made of metal doesnt have pefect Edges. You can chek this out by looking at objects around you, they have Edges with a Little range of Smoothness, so, the best bien todo have this kind of Edges is todo create Little Chamfers in Edges that ned todo be hard (this is for middle-close shots, but objects that are not todo close doesnt have todo be like this). Obiously it not always so easy, if the model has a subdivisión like TurboSmooth, it a ned todo be careful with hard Edges in curved surfaces. here are some modeling wips:
In some cases i se useful todo use booleanas, some people may think booleanas are the worst tool todo use in modeling, but actually theyre very useful todo define cuts with a specific shape, cuts that Will be hard todo make manually, like cilindrical holes. Then i clean up the Mesh fixing the topology.
The leather belt stitches are pretty simple, y just modeled one bended cilinder, multiplicate it along the belt, and then bended all together.
Splines are a los useful todo model some kind of shapes like pipeline-looking ones, insted of extrude a cilinder it easier todo create a Spline and make it renderable using its thickness value. Alos it useful todo make objects that arent like pipelines using Splines. In the watch base, for example i created and extruded a Spline, then added a Shell modifier todo it, and finally made the final details in Editable Poly.
textures some textures like the belt one were done by playing around in Photoshop with some photgraphs downloaded from internet. The look that i wanted todo get in the leather belt was very dificult todo find, so i used some estone cracks and mixed them with some leather textures.
materials the render was done with Vray 1.5 rc5 and i used its materiales. Metal, transparent, Fabric and Plastic were the kind of materiales that i used. the metal material was done with a very dark Diffuse and some reflection. Its glossiness value was very useful todo make it more realistic blurring its reflecions, an amout of 12 in the subdivisión value was enought todo make it not todo much noisy. I set Fresnel reflection and some Anisotropy. the transparent material was done with a light color, reflection with Fresnel, and a lot of refraction with a bluish Fog color.
The Fabric materiales have a fallof Diffuse with perpendicular/parallel type, it a fallof from the normal Diffuse texture todo a lighten one, y used the same but with a higher output amount.
The Plastic materiales has some reflections and a suitable glossiness amount.
lighting when making lighting for this scene i thought about contrast in the lights color, it a god bien todo make a rich scene, like sunsets, where the orange color of the Sun makes contrast with the bluish light bounced by the Sky. It was not supossed todo be an exterior render, but the principle of contrast was almost the same. I created a Studio setup, starting by the main Vray light, y choose the warm color for this one, a god subdivisión amount for this was useful (16). Then two Vray lights at the oposite side of the scene with a cold color and a small multiplier. The background was a bended plane.
rendering this GI setup was made Thinking about the kind of the scene. An Irradiance Map for primay bounces todo make a god result without not todo much rendering time, and Quasi - Montecarlo (brute force in recent Vray versións) for secundary bounces, a god calculation method in secondary bounces for this Studio scene wasnt todo expensive because there isnt todo much light bounces like interior scenes. i used a bluish color for the GI environment and a HDR image in relection/refraction environment, y choose this HDRI making testing with several images until i find the most suitable. The lights reflection in the metal were todo jagged Even with a god antialiasing setup, a god bien todo fix this was turning on the sub-pixel mapping and Clamp Output checkboxes in the Color Mapping ut.
This was the result:
postproduction the Z-Depth was useful todo faq the Depth of Field in Photoshop, y could render it in the Render Elements tab. The enable filtering option makes the render antialiased and the Z-Depth min and max values controls the depth range.
In Photoshop i create a new channel (alpha 1) in the render image and put the Z-Depth map there, y did this todo be able todo use it in the Lens blur filter, the blur Focal distance controls where todo start blurring and the Radius its intensity.
Next i added two layers todo make a more interesting feeling, y used again the Z-Depth this time todo make a Little Fog, obiously it hard todo se ha scene like this with Fog but i found this effect quite interesting adding some density todo the environment and more color contrast with a warm color. it was made with a Brown gradiente and the inverted Z-Depth in its alpha. The second layer was a Dark surrounding halo todo fill the background.
And here the final result:
author info Felix Rodríguez joleanes www: Phoenix - 3d artista - Felix Rodríguez joleanes
Email: h e i @ de h e i, o
.
-- IMÁGENES ADJUNTAS --
×
 Lo primero
+ Publicar sobre
Lo primero
+ Publicar sobre
Configuración
Mis mensajes
Contacto
- 🎪 Actividades y Eventos
- 🎭 Animación y Rigging
- 🟦 Blueprint
- 🔬 Ciencia
- 🎬 Cine y TV VFX
- 📸 Fotografía
- 🖥️ Hardware
- 💡 Iluminación
- 🎨 Ilustración y 2D
- 🖨️ Impresoras 3D
- 🧱 Modelado
- 📰 Noticias
- 💥 Partículas y Dinámicas
- 🧩 Plugins
- 🎞️ Postproducción
- 🛠️ Programas General
- 📷 Render y Cámaras
- 🧵 Texturas y Materiales
- 🎮 Videojuegos
Configuración
Mis mensajes
Contacto

 Citar
Citar